
Filming at night presents its own set of challenges and opportunities.
It’s when the shadows deepen, and the ordinary becomes mysterious, offering a canvas for some of the most compelling scenes in cinema.
We’ll guide you through mastering the art of nocturnal shoots, from lighting techniques to camera settings, ensuring your night scenes are just as captivating as those shot in broad daylight.
Navigating the dark isn’t just about the technical know-how; it’s about embracing the quiet drama that nightfall brings.
In this guide, we’ll share essential tips to harness the power of the night, so your footage stands out with the intrigue and intensity that only nighttime can provide.
Get ready to elevate your filmmaking game under the stars.
The Allure Of Nighttime Filming
When we jump into the art of nighttime filming, it’s like stepping into a world where the ordinary becomes extraordinary.
Lights flicker with a different vibrancy, and shadows carve out tales that the sun can’t tell.
Filming at night presents colors and textures that are often unseen in daily life.
It pushes our creativity to capture the unique moods and ambiances that only emerge after dark.
The quiet of the night amplifies sounds, making each rustle and whisper integral to the storytelling.
This serenity allows for a more focused set, where every moment feels intentional.
Night scenes have a special kind of intimacy and tension.

Consider the closeness of characters in Collateral or the unrelenting suspense in Nightcrawler.
We’ve seen how darkness can be a character in itself, offering a canvas for emotions that daylight can’t always convey.
The contrast between light and dark serves as a powerful narrative tool, shaping each scene with precision.
We also can’t ignore the practical advantages of nighttime filming:
- Reduced background interference,
- Cooler temperatures,
- Availability of locations that are busy during the day.
Even though the challenges, nighttime filming carries an undeniable allure that we can’t resist.
Ours is the chance to reveal the hidden facets of our world, creating visuals that are as captivating as the stories we tell.
Through careful planning and inventive techniques, we can translate the quiet drama of night into compelling filmic language.
With each setup and every shot, we embrace the potential of the nocturnal hours, crafting scenes that resonate with viewers across the globe.
https://youtube.com/watch?v=fhqMr2gwQvc
Importance Of Lighting In Night Shoots
Lighting stands as the backbone of nighttime cinematography, transforming the often invisible night into a palette for storytelling.
In the shadows of darkness, strategic use of light sculpts the scene, guiding the audience’s focus and setting the emotional tone.
Where daylight provides a natural illumination, night shoots require meticulous planning – every light source plays a critical role.
We leverage various lighting techniques to reveal subtle details or shroud them in mystery.
Artificial lighting must mimic the nuances of natural light to maintain authenticity.
Films like Blade Runner 2049 showcase how lighting design can create futuristic landscapes that feel both otherworldly and believable.
Conversely, minimal lighting setups can result in a raw, gritty aesthetic.
Think of Sicario, where darkness itself becomes a character, enhancing the film’s tension and suspense.
Striking the right balance in lighting is crucial for night shoots:
- It ensures visibility and depth,
- It enhances mood and dramatic effect,
- It maintains continuity between shots.
Our approach is twofold – we use technical knowledge to conquer the darkness and artistic insight to play with it.
Light sources, be they practicals or professional gear, are chosen to serve the narrative and visual needs of the scene.
We understand that lighting gears the cinematic experience.
Mastery of light at night provides us with an immense creative canvas.
From the unmistakable glint of city lights to the subtle dance of firelight on faces, it’s our secret to capturing night’s elusive beauty.
Types Of Lighting Techniques For Nighttime Filming
When filming at night, we have a variety of lighting techniques at our disposal to enhance the visual storytelling and create the desired atmosphere.

Each technique serves a specific purpose and can be used alone or in combination to achieve the filmmaker’s vision.
Practical Lights play a crucial role in nighttime filming.
They’re actual visible light sources within the scene such as lamps, streetlights, or candles.
By relying on practicals, we enhance realism and provide a sense of depth and dimension.
Films like The Godfather masterfully use practical lights to create mood and draw the viewer into the scene.
Ambient Lighting refers to soft, indirect light that often imitates moonlight or distant city lights.
It’s essential for revealing the environment and providing a base level of illumination to avoid pitch-black backgrounds.
To maintain authenticity, ambient lighting should be subtle yet sufficient to reveal silhouettes and surroundings.
With High Contrast Lighting, we play with the sharpness of shadows and the intensity of light to sculpt a dramatic look.
This style can heighten tension and direct attention by creating stark differences between light and dark areas.
It’s effective for emphasizing contours and textures, shown powerfully in films like Collateral.
Another technique we Carry out is Backlighting, which separates the subject from the background, helping them to stand out in low-light conditions.
When positioned correctly, backlighting creates a halo effect, lending scenes a mysterious or ethereal quality, as seen in Skyfall.
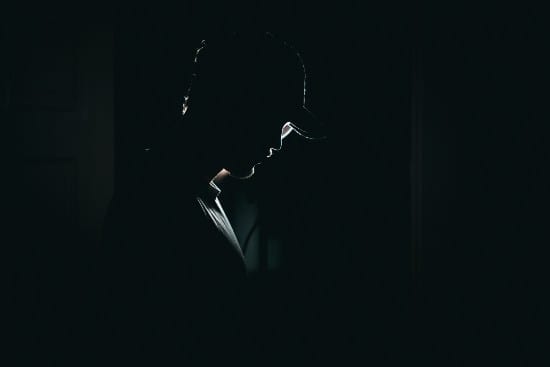
finally, Silhouetting is a method where the subjects in the foreground are darkened against a lighter background.
This stark visual effect is excellent for creating a sense of anonymity or portraying characters in a threatening or vulnerable state.
- Practical Lights – Enhancing realism and depth,
- Ambient Lighting – Providing base illumination,
- High Contrast Lighting – Sculpting dramatic looks through harsh shadows,
- Backlighting – Creating separation and halo effects,
- Silhouetting – Offering anonymity and stark visual contrasts.
It’s vital that we understand each lighting technique’s impact and how to blend them seamlessly for a coherent visual theme.
The trade-off between visibility and mood is a delicate dance, one that requires not just technical knowledge but also a creative touch.
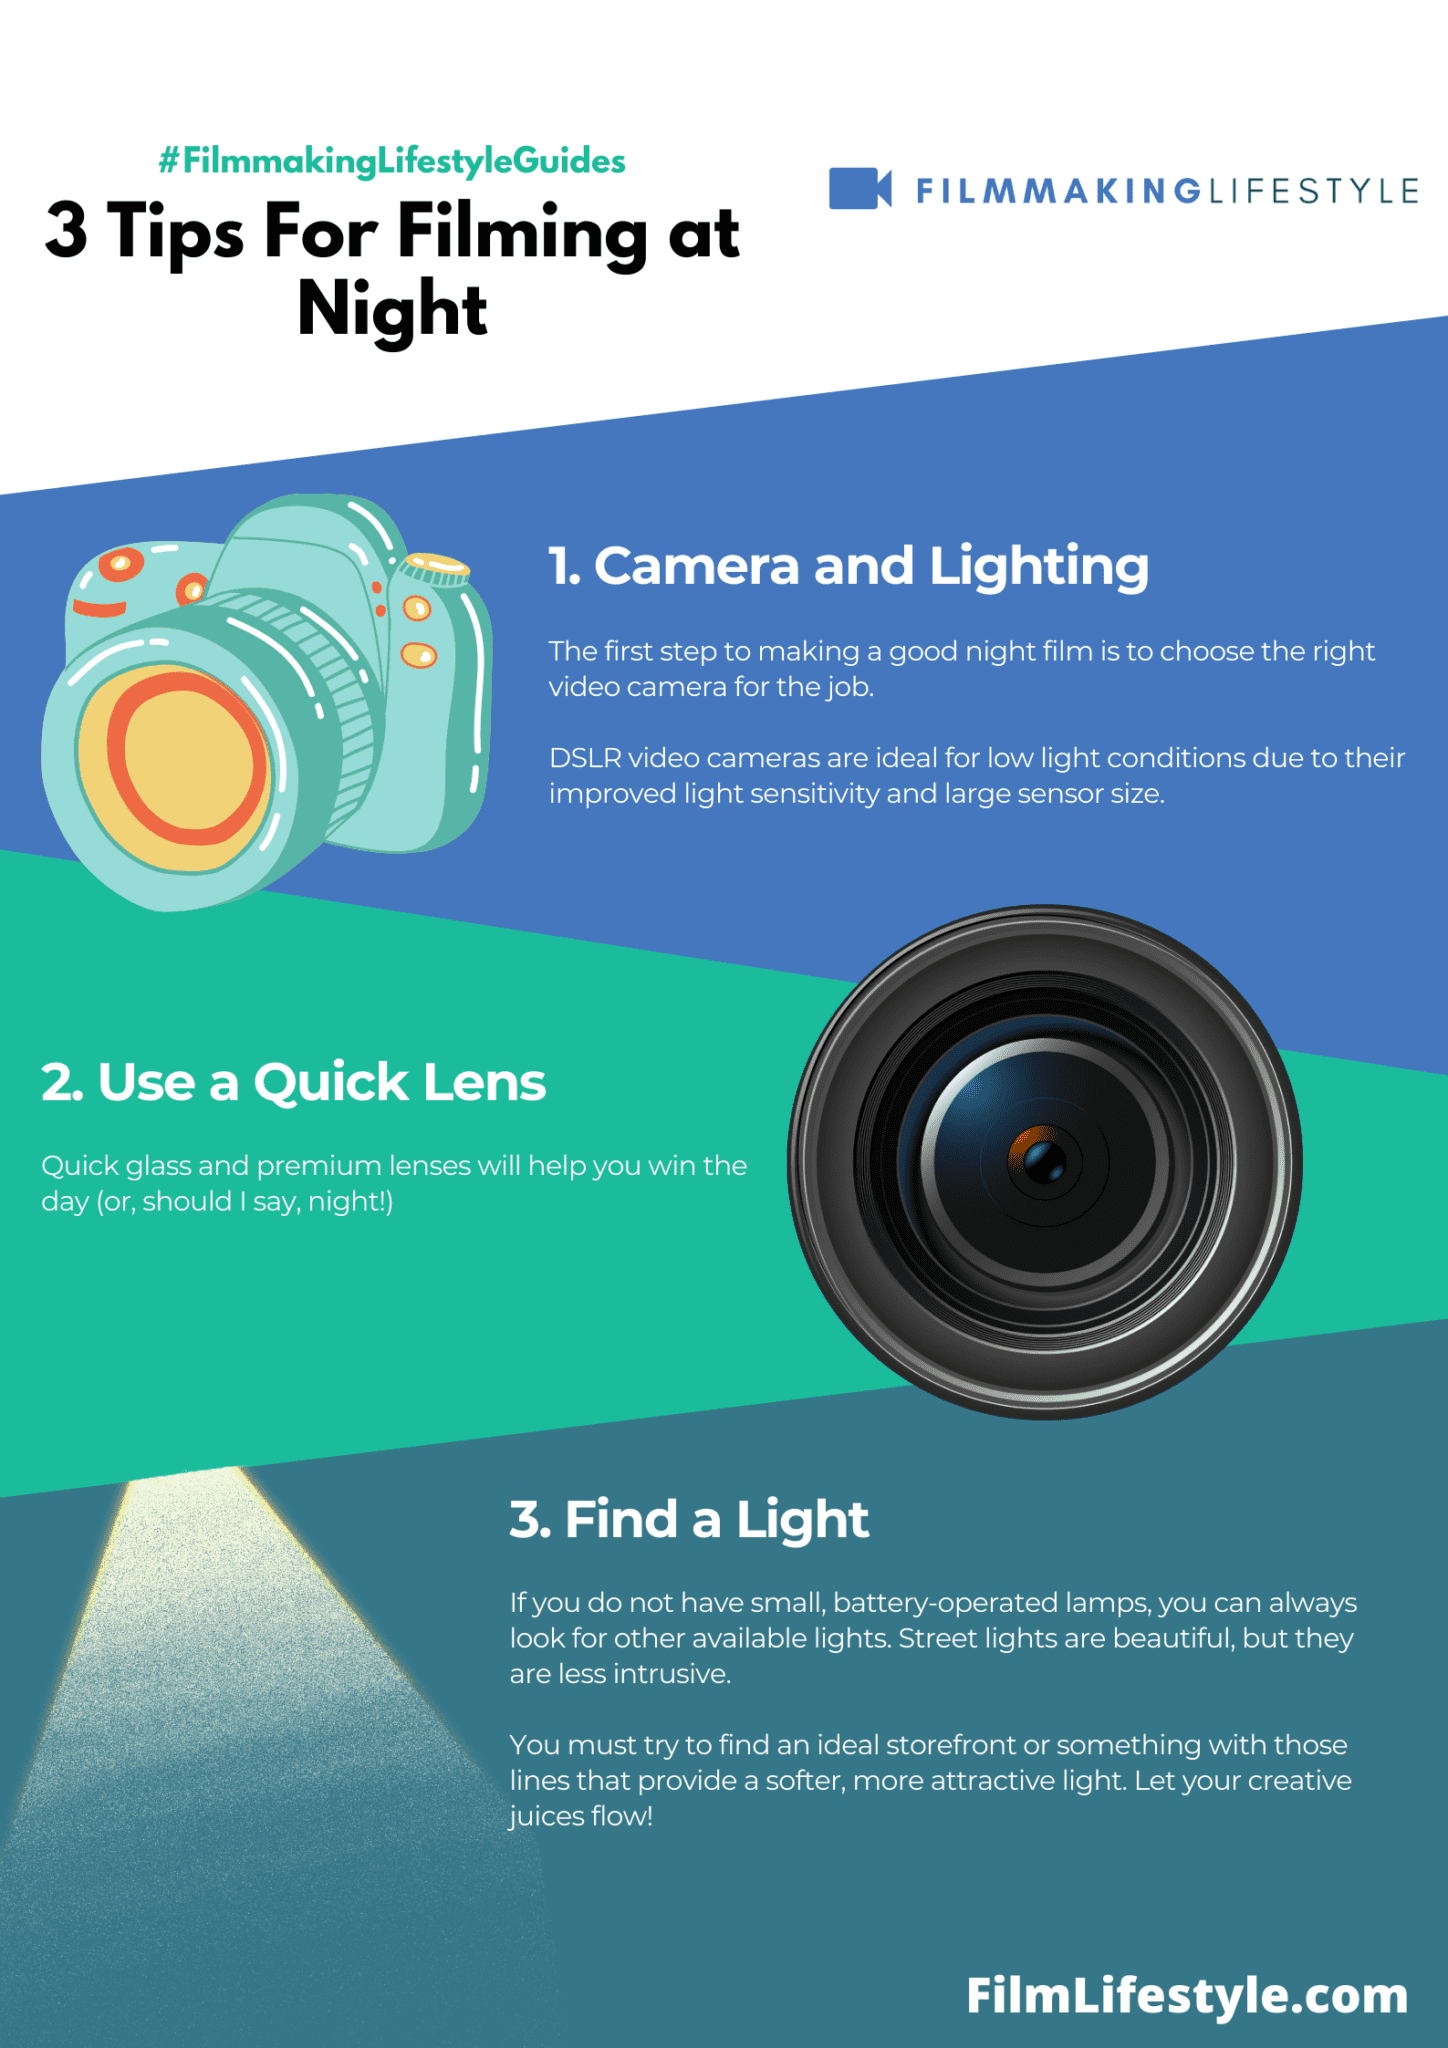
Camera Settings For Capturing Night Scenes
Oftentimes, when we’re tasked with filming at night, the default assumption is to crank up the ISO to combat the darkness.
But, doing so can introduce an excessive amount of noise into the footage.
We prefer to strike a balance with ISO settings – high enough to illuminate the scene without degrading image quality.
The sweet spot varies depending on the camera, but a range between 800 and 3200 often yields acceptable results.
Aperture also plays a critical role in night shoots.
A wide aperture lets in more light, making it ideal for low-light situations.
We usually aim for lenses with an aperture of f/2.
8 or wider, as these allow the maximum light to reach the sensor, brightening our scenes considerably.
Shutter speed adjustments can further refine our night footage.
A rule of thumb we follow is to not go below the frame rate, which generally sits at double the frame rate for a natural motion blur.
For a 24fps shooting, that means a 1/48 or 1/50 second shutter speed is optimal.
Manual focus becomes our best friend in the night as autofocus can struggle in low light conditions.
It grants us the precision and reliability needed to ensure sharp, in-focus shots where it counts.
Here are some additional techniques we keep in mind:
- Use a Monopod or Tripod – This ensures stability at slow shutter speeds and avoids unwanted motion blur.
- Shoot in RAW – It gives us more flexibility during post-production to correct exposure and color.
- Monitor Exposure Using Histograms – To avoid losing detail in the shadows or highlights.
Mastering these camera settings allows us to capture the night’s elusive qualities without sacrificing the integrity of our footage.
And while night scenes pose their technical challenges, they also offer a canvas for us to paint our most evocative and memorable artistic strokes.
With the right balance of ISO, aperture, and shutter speed, combined with the stability of a tripod and the versatility of RAW formatting, our night scenes come to life in the edit, often exceeding our expectations in terms of mood and atmosphere.
Overcoming Challenges Of Filming At Night
Nighttime filming presents unique hurdles, but with the right strategies, we can successfully navigate these challenges.
One fundamental challenge is visibility – both for the camera and the crew.
Here’s how we tackle it:
- Ensuring crew safety by marking potential hazards with glow tape or using safety lighting,
- Using wide-aperture lenses and cameras capable of handling high ISO settings for better light capture.
Noise is another byproduct of low-light shooting, often resulting from high ISO settings.
We reduce noise with:
- Fine-tuning ISO levels,
- Employing noise reduction software in post-production.
Focusing in low light conditions can test even the most seasoned filmmakers.
To ensure sharpness where it counts, we:
- Frequently use manual focus with assistive technologies like peaking or magnification,
- Carry out remote focus pulling systems for dynamic shots.
Balancing light and dark areas requires an understanding of contrast.
We pay careful attention to:
- The dynamic range of our cameras,
- The histogram to avoid clipping in the shadows or highlights.
Color accuracy can drift under artificial lighting.
We maintain true-to-life colors by:
- Customizing white balance settings on location,
- Using color-correcting gels on lights as needed.
Synchronizing the movement of our actors with the available lighting calls for precise coordination.
We strive to:
- Rehearse scenes extensively under the lighting setup,
- Keep communication channels open between the director, cinematographer, and lighting department.
Developing a night shoot toolkit is essential for every film crew.
Our toolkit includes:
- High-quality, portable LED lights,
- Reflectors and diffusers to soften and shape light,
- Backup batteries and power solutions for uninterrupted shooting.
By mastering these techniques, we overcome the darkness and turn it into an ally, capturing the allure of the night and delivering stellar nighttime footage in each production.
Filming At Night Guide – Wrap Up
We’ve explored the enchanting world of nighttime filming and the crucial role lighting plays in shaping cinematic masterpieces.
With the right techniques and tools, we can transform the challenges of the dark into striking visuals that captivate audiences.
Remember, it’s our careful planning and creative vision that turn night shoots into compelling stories.
Let’s harness the power of the night and illuminate our films with the depth and drama that only the after-hours can offer.
Now it’s time to take our cameras, step into the night, and let our imaginations light up the screen.
Frequently Asked Questions
What Makes Nighttime Filming Unique For Filmmakers?
Nighttime filming offers a distinctive ambiance and emotional depth that can’t be replicated during the day.
It requires careful use of artificial light to guide focus and set the scene’s mood.
Why Is Lighting Crucial In Night Shoots?
Lighting is essential in night shoots to sculpt scenes, direct the audience’s attention, and establish the emotional tone.
It needs to mimic natural light and be meticulously planned.
Can You Give Examples Of Films That Use Lighting Effectively At Night?
“Blade Runner 2049” and “Sicario” are excellent examples of films that use lighting to create unique aesthetics and to enhance mood and tension during night scenes.
What Types Of Lighting Techniques Are Used For Nighttime Filming?
Nighttime filming techniques include practical lights, ambient lighting, high contrast lighting, backlighting, and silhouetting.
Each technique offers a different way to shape and color night scenes.
What Are The Challenges Of Filming At Night?
Challenges in night filming include ensuring visibility, minimizing noise, maintaining focus, balancing light and dark areas, achieving color accuracy, and coordinating actor movement with lighting.
What Should Be In A Night Shoot Toolkit?
A night shoot toolkit should include high-quality portable LED lights, reflectors, diffusers, and reliable backup power sources to handle the demands of nighttime filming effectively.


Great post! I completely agree that filming at night can be a game-changer for creating a unique and moody atmosphere in our videos. As a photographer and filmmaker, I’ve found that experimenting with different lighting techniques and using available light can really make a difference. Thanks for sharing your insights!