
So you have a video production company, or you’re a freelance filmmaker, but you don’t yet have a website?
You’ve been thinking about it, but you just don’t know how to get started?
Well, today I’m going to show you how to start your filmmaker website (or production company website) in just 3 easy steps.
Don’t wait. Today is your day to start your video production company website. I covered websites in detail in a previous post.
That was a very detailed article that gave you the whys and reasons for needed a website to show off your work.
I had a number of comments that expressed how informative the article was and how it really convinced them that they needed a site, but that they still didn’t know exactly how to do it.
That’s where this article comes in. It’s a lot more how-to. Couple it with my Complete Guide To Websites For Video Businesses and Filmmakers and you’ll be onto a winner in no time!
Put things on hold for the next 15 minutes and follow the three steps below. You’ll be up and running with your own production company website before you know it.
Let’s go!
Note: Some of the links below are affiliate links and I will earn a small commission if you purchase through these links. I have used all of the products listed below and recommend them because they are awesome companies that I trust and highly recommend.

Three Steps To A Website:
- Domain Name and Hosting
- Install WordPress
- Make it look good
1. Domain Name And Hosting
This part is great and is where it all begins!
At this point, you should be clear on a name for your business. I discuss naming your business in the Complete Video Business System guides, so consult that article if you haven’t decided on a name just yet.
For the purpose of this tutorial, I’m going to walk you through creating a website for the (entirely) fictional Delicious Hippo Video company. I know, I know, but let’s have some fun with this!
So, we’ve decided on our groovy name (Delicious Hippo Video), so now we need to go out there and find out if we can purchase a domain name for this company.

A domain name is the website address that someone types in to find a place on the internet. So, for this site, www.filmlifestyle.com is the domain.
I highly recommend Namecheap as a quality supplier of domains. It’s where I get all my domain names for my various projects from.
STEP 1 Is To Signup For A Namecheap Domains Account.
So, from the Namecheap front page, where it says “Find your new domain name,” we’re going to enter the domain we’re looking for based on our company name. If the domain name is already taken, it will tell us.
You want something short and punchy, so rather than the full company name (Delicious Hippo Video), I’m going to enter: delicioushippo.com
If you’re a US based business, you’ll want to put .com after your business name. If you’re based elsewhere, you should use your country’s domain identifier. So for the United Kingdom, you’d search for a .co.uk
Okay, I entered delicioushippo.com and, low and behold, it’s available! Probably won’t be if you don’t read this tutorial early on, as I’m sure a reader of this article will swipe it!
We’re now going to click on the little cart icon (shown in the top right of the screenshot).
That will add the domain to your shopping cat.
Next, click the red View Order button, followed by the red Confirm Order button. I won’t go through these steps as Namecheap change their order and style often. You’ll need to signin to your Namecheap account if you haven’t already and confirm the purchase of your domain.
You’re now the proud owner of a brand new shiny domain!
STEP 2 Is To Get Website Hosting
Now that you have a domain name, you need somewhere for that domain name to ‘live’ online.
We’re going to use Siteground as our website hosting provider. I’ve used them for all my websites for years and they’re a solid and dependable solution, who’s customer support is fantastic.
Signing up for hosting with Siteground is simple. Once you’ve followed the link, click on Sign Up. You’ll now be presented with a screen like this, asking you to select which type of hosting you want:
If you follow my link, there are special discounts for my readers.
Once you’ve completed that step, you’ll be presented with this screen:
2. Installing WordPress
Now that we have our domain and our hosting, we have the rough outlines of our filmmaker website. Think of this like building and moving into a home:
- Your domain name is like the street that your house is on.
- Your hosting is the brick and mortar of the house.
- Your content (the posts and pages of your site) is the stuff you have within your house.
- So a Content Management System is like the shelves, bookcases and cabinets that you have in your house. It’s what you store your content in.
A Content Management System (CMS) is a piece of software that you build the website itself with. I recommend you use WordPress as your CMS. WordPress is an online software that comes bundled with your Siteground account – you just need to activate it.
Lots has been written about WordPress and there’s a reason why a large percentage of all the websites in the entire world use WordPress – because it’s awesome! WordPress is great for portfolios and every filmmaker needs a portfolio to show off their work.
With tools like WordPress, creating a website is no longer just within the grasp of internet techies who hold all the cards – you can now do it yourself! Everything’s pretty straightforward if you use WordPress.
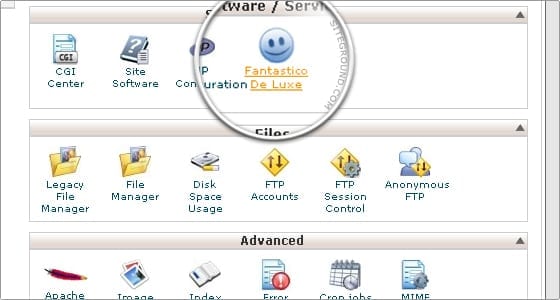
STEP 1: Login to the User Area of your Siteground account and select the Fantastico De Luxe icon. This is an installer that makes everything a lot easier:

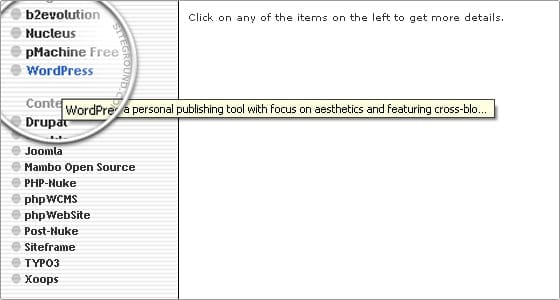
STEP 2: Find the WordPress option on the left hand side and click it:
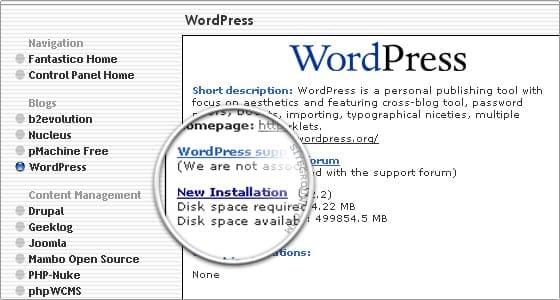
STEP 3: Choose a new installation:
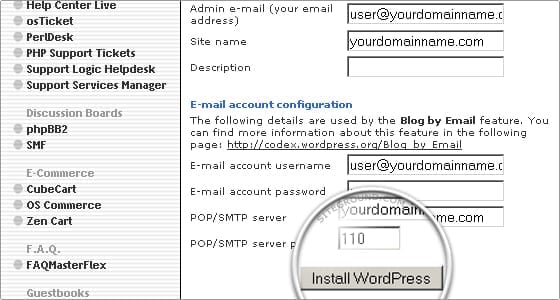
STEP 4: Next, you’re going to want to decide on the location of your website. If you want it to appear as the front page (recommended), then leave the directory box blank and fill out the rest of the details:
STEP 5: You’ll be presented with the screen below if everything is successful. Now click Finish installation:
STEP 6: If everything works, you’ll be given a screen showing the location you need to login to your website, as well as your login details:
Type your URL into your web browser. You’ll see a login screen like the one below. Enter your Username and Password you were given during the previous step.
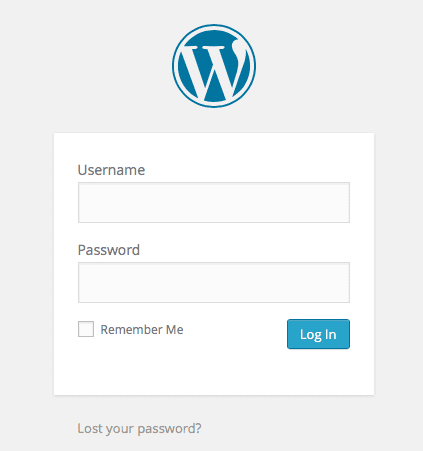
You’ve now logged into your website. Congrats!
Time to move onto the final part…
3. Make It Look Good
Now that you have the groundwork done, it’s time to pretty things up!
You’re minutes away from getting you work seen by thousands. Even millions. More on that in a future article.
But before all that, there’s one final piece to setting your website up. It’s time to pick your theme!
A “theme” is the look and style of your website. Now, WordPress has tons of free themes to pick from. So take a look at the options here.
If you really want to make things look great, though (and you should), you’ll need a premium theme. These are paid themes. Here are my recommendations:
- The Thesis Theme – This is one of the best WordPress themes that money can buy. Highly recommend it.
- Theme Isle – Check these guys out for more premium theme options.
- Template Express – Another great source of premium themes you should check out.
- Elegant Themes – These guys really know what they’re doing. They have top themes that I’ve used on a number of my sites and their support is fantastic, which is always a plus!
I hope this article has been helpful in encouraging you to start your filmmaker website. If you get stuck along the way with anything, SiteGround Support are awesome and will help you out.
So have you started your website yet? Let us know how you get on in the comments below. And don’t forget to share this article using the share buttons below!
Damn!! This is a great write up on websites. Always wondered how to start one
Thanks for everything you do here!
Appreciate the comment, TreekenT. Thanks for being a reader here.
Fabrik.io is a super beautiful, intuitive web platform- very easy to use – a bit of an insider secret-many of the leading film-makers use it-great testimonials too
Thanks for the heads up, Hannah!