
Want to know how to clean camera sensor? A dirty camera sensor can ruin a photo, and cleaning it by yourself may seem scary. Don’t worry, check out our guide on how to clean your camera sensor safely
A clean camera sensor is essential to maximizing image quality. Dust and dirt on the sensor ruins photos by creating dark spots that can be impossible to remove in post-processing.
How do you know if your camera’s sensor is dirty? Look for dark spots in similar places on all your images. These are often in the corners but can appear anywhere
In this guide, we’ll explain why cameras get dirty, how to check if yours needs cleaning and run through three ways of cleaning a DSLR or mirrorless camera’s sensor.
How To clean camera Sensor
What Is Cleaning A camera sensor?
Having a dirty sensor can be a serious pain in the behind. The dust spots can be difficult to remove in post-processing, especially if they are large or in bright areas of the photo.
But don’t worry, there are many methods how to clean camera sensor and other camera parts. You can do it yourself or bring your camera to a service.
You should always take good care of your equipment. Things like cleaning the lens or sensor are a part of maintenance and should be done regularly.
No matter how careful you are, sometimes you will get dust on your sensor and that’s completely normal. It is just up to you when you decide to clean it and how often.
Cleaning is not rocket science but it does require some knowledge and skills.
Dust spots on your images?
It’s likely your camera sensor’s calling for a clean.
We know the thought of touching that delicate sensor can send shivers down any photographer’s spine, but with the right guidance, it’s a breeze.
We’ll walk you through the steps to ensure your photos are spotless and your sensor remains unscathed.

Whether you’re dealing with a pesky speck or a full-on assault of dust bunnies, we’ve got you covered.
Stay tuned as we jump into the best practices for cleaning your camera sensor, ensuring your gear stays in top-notch condition for that next picture-perfect moment.
Reasons For Dust Spots On Camera Sensor
Dust spots on your camera sensor can be incredibly frustrating, especially when they show up in the final cut of a project.
They often result from several common sources in a filmmaker’s environment.
Changing lenses frequently is a prime suspect.
Every time we swap out a lens, we’re potentially inviting microscopic invaders onto our sensor.
Storage conditions are another factor.
When our cameras aren’t stored in a clean, dust-free environment, particles can settle on the sensor over time.
Here’s a short list of culprits we often overlook – – Outdoor filming locations
- Unused lenses gathering dust,
- Cleaning tools that are not dust-free.
Maintenance habits play a significant role as well.
Cameras that have seen a lot of action without regular cleaning can accumulate debris on the sensor, leading to more noticeable dust spots in our footage.
Sometimes the problem is not just environmental.
Internal camera mechanisms, like the mirror movement in DSLRs, can also contribute to this issue.
Even with the most meticulous care, dust is a reality for all filmmakers.
As we’ve run into these issues during shoots, we’ve learned that an understanding of the causes helps immensely with prevention.
Preventative measures are crucial.
We should handle our gear in clean areas as much as possible and keep our camera enclosures sealed when not in use.
Our experience tells us – it’s not just about cleaning our sensors, it’s also about taking steps to minimize dust exposure in the first place.
With proper practices, we can reduce the frequency and severity of sensor dust spots and keep our focus where it belongs – on creating visually stunning films.
Understanding Camera Sensor Cleaning
First and foremost, we must recognize that camera sensor cleaning is a delicate process.
Even the most careful handling can’t always prevent dust from settling on the sensor, and once it’s there, it can mar the quality of our footage.
For filmmakers, a clean sensor is imperative to ensure that every frame of our work maintains crisp, clear quality.
While photographers can often mitigate the effects of dust spots with quick post-processing tricks, in filmmaking, continuous motion means that these imperfections could easily become magnified.

Imagine tracking a profound scene in Schindler’s List only to have a dust spot distract your audience at a pivotal moment.
The stakes are simply too high to ignore.
Cleaning the sensor ourselves can be a cost-effective solution, but it’s accompanied by significant risks.
Accidentally scratching the sensor or leaving streaks could lead to costly repairs or replacements.
That’s why it’s crucial to use the right tools:
- Sensor swabs designed specifically for your sensor size,
- A high-quality, sensor-safe cleaning solution,
- A rocket blower to remove loose particles without physical contact.
The frequency of cleaning will vary depending on how often we change lenses, where we’re shooting, and the storage conditions of our equipment.
A good rule of thumb is to inspect the sensor before major projects or after shooting in particularly dusty or sandy environments.
eventually, the goal of sensor cleaning is to restore and maintain our camera’s imaging potential.
By doing so, we keep the visual integrity of our films intact – invisible to the audience but essential to our craft.
Understanding when and how to clean your camera sensor is just as much a part of filmmaking as understanding lighting and composition.
Tools And Materials Needed For Cleaning
Before we jump into the sensor cleaning process, we need to ensure we’ve got the right tools and materials at hand.
Sensor cleaning is a delicate task, and using improper tools can cause irreparable damage.
Here’s a list – narrowed down to the essentials – to get us started:
- Sensor cleaning swabs,
- Sensor cleaning solution.
It’s crucial to select swabs that match our camera’s sensor size.
This helps us avoid touching the sensor edges and potentially causing smears.
The cleaning solution should be specifically designed for camera sensors; anything else might leave residue or worse, corrode the sensor.
also, we need to have a few more items to support the cleaning process:
- A blower bulb – for dislodging loose dust without physical contact,
- LED sensor loupe – to spot dust particles with ease,
- Microfiber cloth and gloves – to handle the camera without leaving fingerprints or dust behind.
Each tool plays a vital role.
The blower bulb starts the process by removing particles that could scratch the sensor during a swab.
The loupe helps us inspect the sensor to ensure cleanliness.
Microfiber cloths and gloves are the unsung heroes, maintaining a clean working environment.
Remember, before the actual cleaning, we should always fully charge our camera battery.
A low battery could result in the camera shutting down mid-cleaning, which in turn might lock a swab or other tools inside, risking damage.
Charge your battery to keep the cleaning process smooth and uninterrupted.
Preparing Camera For Sensor Cleaning
Before we jump into the sensor cleaning process, it’s crucial that we correctly prepare our camera.
This preparation ensures that we minimize the risk of damage and make the cleaning process as efficient as possible.
First, we need to find a clean and well-lit work area.
An environment free from dust and debris is ideal for sensor cleaning.
Our workspace should also offer plenty of light to help us spot any specks or smudges on the camera sensor.
It’s essential to set the camera to manual cleaning mode.
This step will expose the sensor and allow us to access it for cleaning thoroughly.
Check your camera’s manual for specific instructions on how to activate this mode.
We’ll also want to ensure our camera is positioned safely.
It’s best to place it on a stable surface or use a tripod to keep it steady during the cleaning process.
This approach prevents any unwanted movement that could disrupt our cleaning efforts or cause damage.
Next, we’ll gather all the necessary tools for the cleaning:
- Sensor cleaning swabs,
- Cleaning solution appropriate for camera sensors,
- A blower for removing loose dust.
Without proper preparation, attempts to clean the sensor can lead to scratches, smudges, or even worse, permanent damage.
Through these careful steps, we can move forward confidently, knowing that our camera is set up for a successful cleaning session.
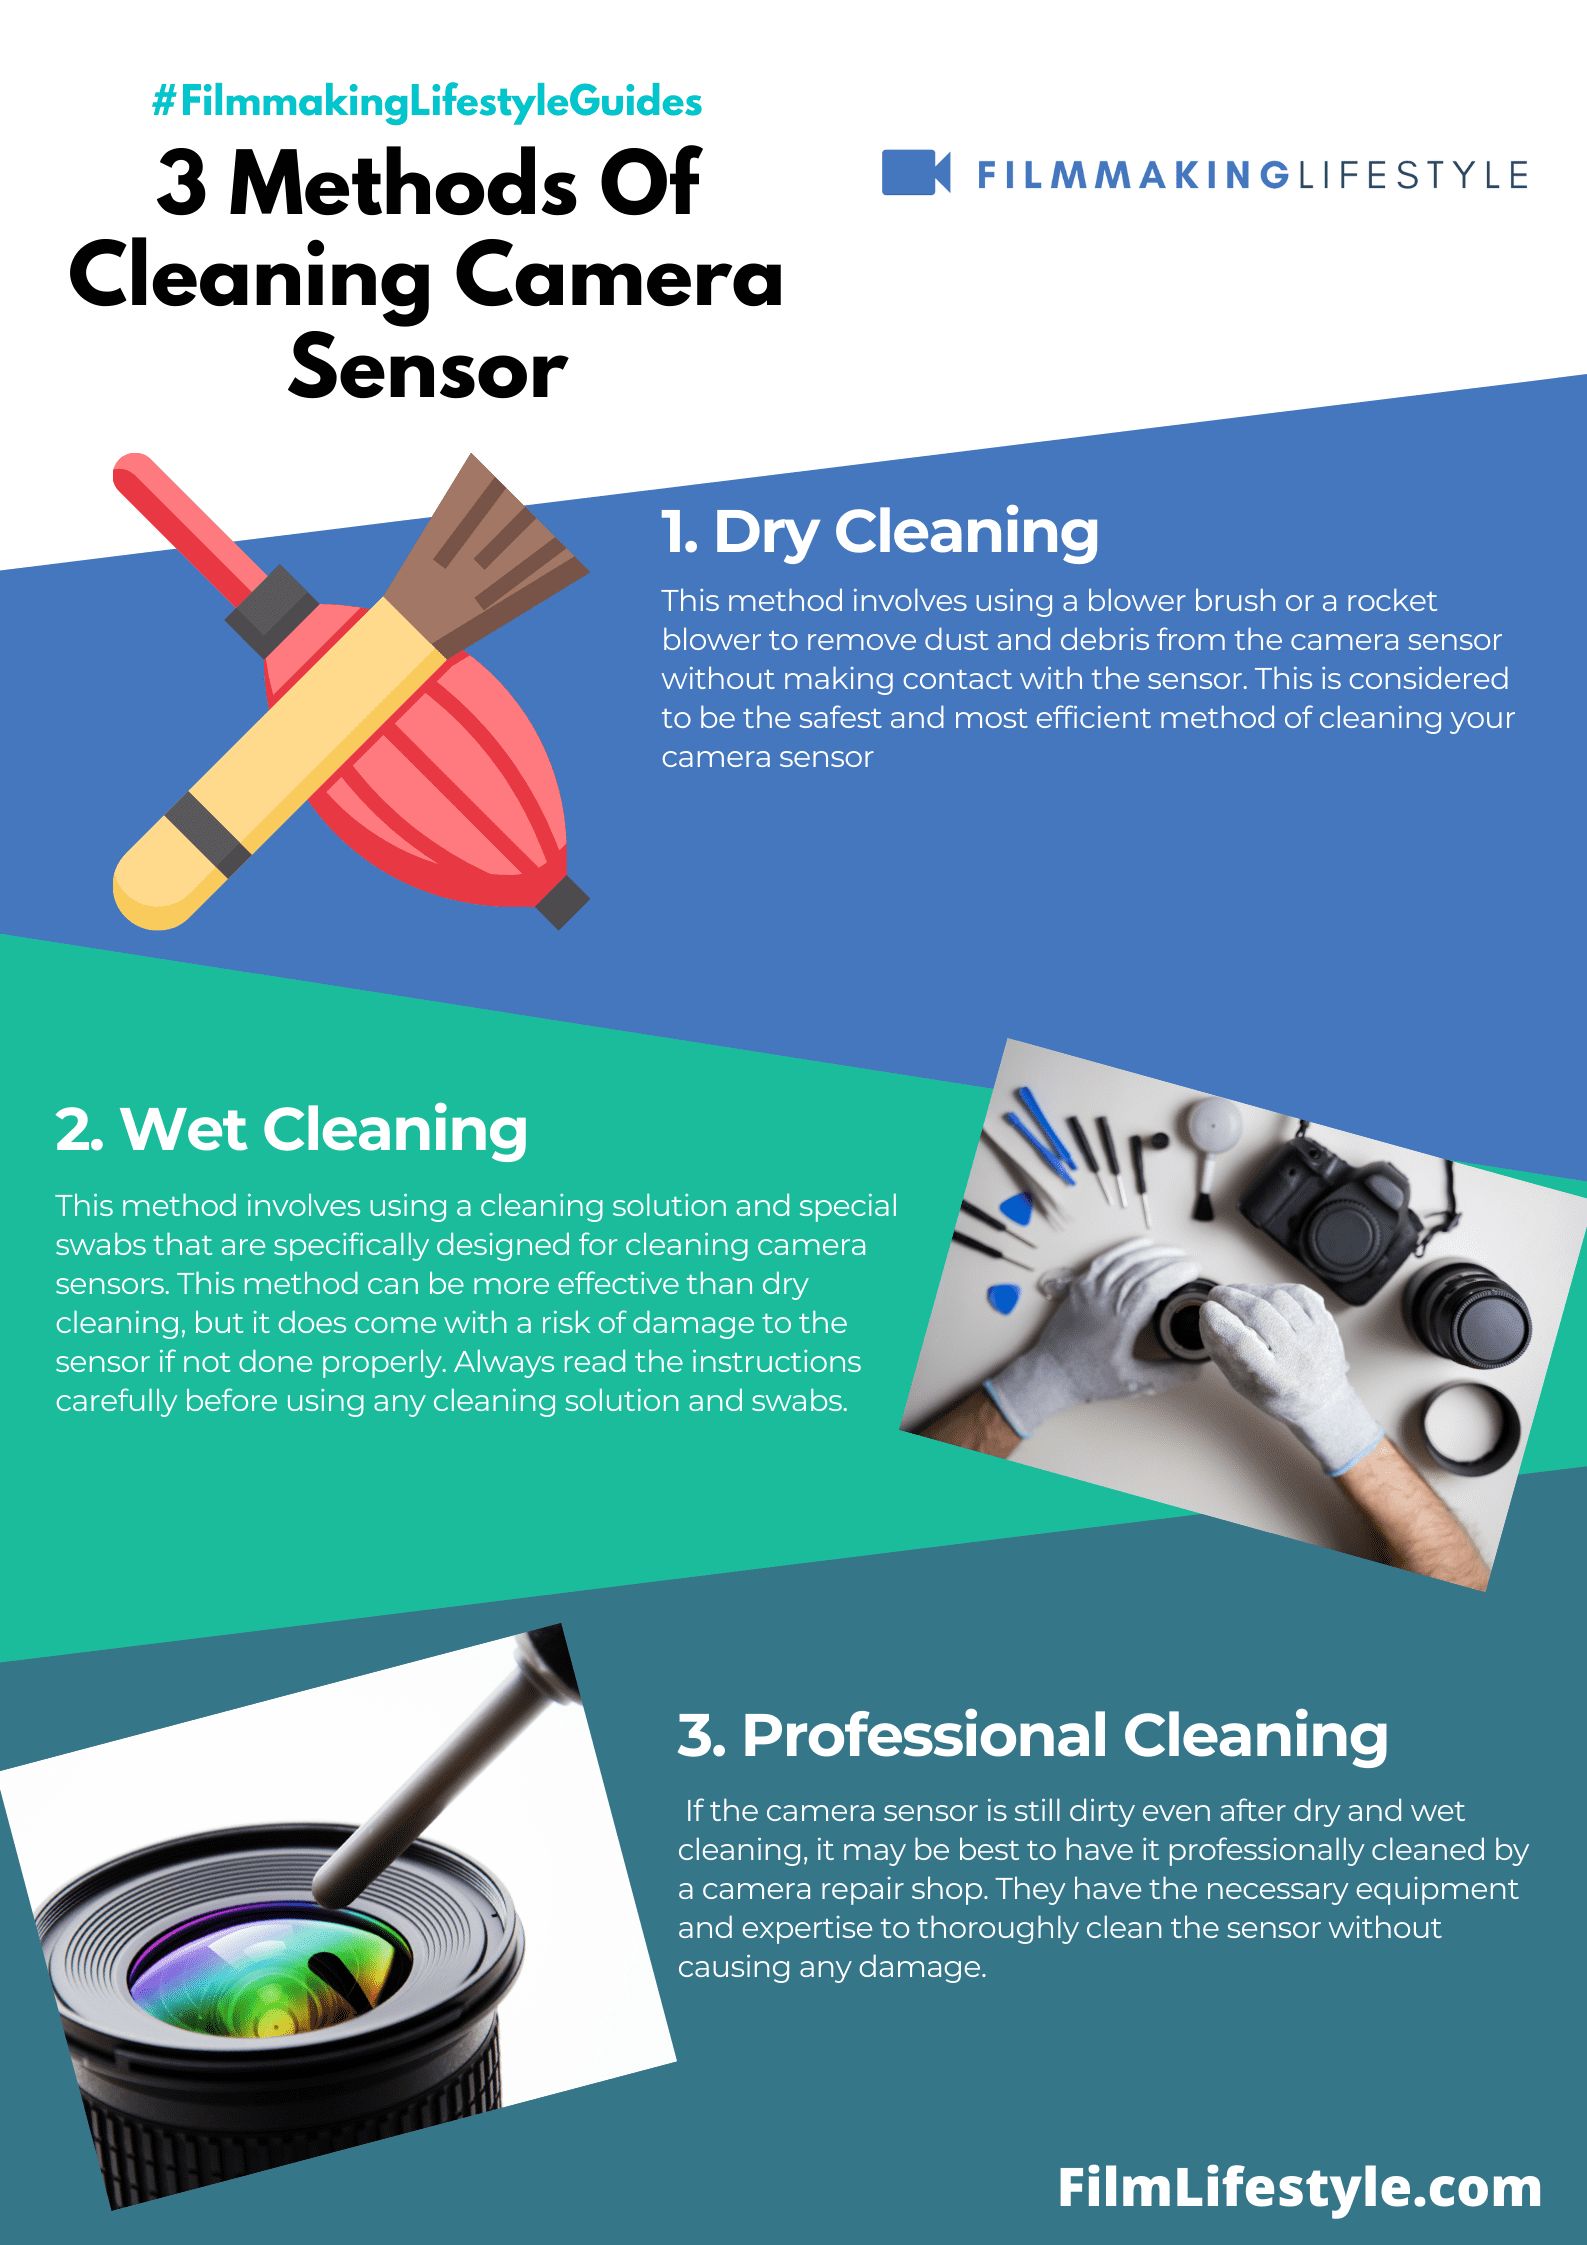
Dry Method Of Sensor Cleaning
Before we jump into using any liquids, it’s crucial we understand the dry method of sensor cleaning.
This method is often the first choice for removing dust and is less risky than wet cleaning.
By using a sensor brush or air blower, we can dislodge and remove particles without touching the sensor.
It’s a technique that demands a steady hand and patience.
The steps for the dry cleaning method are straightforward:
- Ensure the camera is placed sensor-side up to prevent additional dust from settling.
- Use a blower to gently direct a stream of air onto the sensor, avoiding direct contact.
If the blower isn’t effective, we can advance to a sensor brush.
These brushes are specially designed to be statically charged and lift dust off the sensor.
- Lightly drag the brush across the sensor in a smooth motion.
- Check your progress with a sensor loupe to ensure all dust is removed.
It’s essential we don’t rush the dry cleaning process.
Hasty movements can cause more harm than good.
also, using a well-lit work area is imperative to see the smallest specks of dust.
Lighting should be direct and even to spot dust particles easily.
When dust proves stubborn or the sensor needs a deeper clean, that’s when we might consider the wet method.
But it’s vital to adhere to the dry method first to prevent unnecessary liquid contact.
Remember, our goal is to maintain the integrity of our filmmaking equipment.
Ensuring our camera’s sensor remains pristine is key to capturing those breathtaking scenes we envision for our projects.
Understanding and applying the correct sensor cleaning techniques can save us from costly repairs in the long run.
Wet Method Of Sensor Cleaning
After the dry method has been exhausted, it’s time to introduce the wet method of sensor cleaning.
This involves a cleaning solution and sensor swabs, which must be specifically designed for camera sensors to prevent damage.
Wet cleaning is typically a filmmaker’s last resort because it requires direct contact with the sensor.
It’s imperative to use the correct type and amount of solution to avoid any liquid damage.
Here’s the step-by-step process:
- Ensure the camera is facing downwards to prevent additional dust from settling.
- Apply a few drops of the cleaning solution to the sensor swab.
- Gently glide the swab across the sensor in a single, smooth motion.
- If needed, use the other side of the swab for a second pass.
Remember that each swab should only be used once to eliminate the risk of re-depositing dirt.
Also, too much liquid can lead to streaks or damage, so use a minimal amount.
To guarantee a streak-free finish, invest in a high-quality cleaning solution that evaporates quickly and leaves no residue.
Look for brands renowned among our fellow filmmakers for their reliability and camera safety.
Before moving on with the process, always inspect the sensor again using a sensor loupe.
This precaution ensures that no smudges or streaks remain and that the sensor is impeccably clear for our next shoot.
Wet cleaning may seem daunting, but with careful attention to detail and the right tools, it can be safely accomplished.
Practice leads to confidence and contributes greatly to maintaining the optimal performance of our equipment in our filmmaking endeavors.
Tips And Precautions For Sensor Cleaning
Aspiring to achieve crystal-clear footage, sensor cleaning is a task that filmmakers must approach with considerable care.
Maintaining the integrity of our camera sensor is crucial, and we’ve compiled essential tips and precautions to guide us through the process.
Testing Sensor Cleanliness Beforehand is vital.
We often take a few test shots against a plain background at a small aperture to determine if the sensor actually needs cleaning.
This helps us avoid unnecessary contact with the sensor and prolongs its life.
Always Use the Right Tools – Never compromise on the quality of cleaning tools.
We prioritize using sensor-specific brushes and swabs because using generic or substandard tools can lead to scratches or sensor damage.
- Turn Off the Camera Before Cleaning – to prevent static charge build-up that might attract more dust.
- Don’t Use Excessive Force – a gentle approach ensures the sensor isn’t damaged.
Why the Environment Matters: We always choose a clean and dust-free environment to minimize the chance of new particles landing on the sensor during the cleaning process.
Handling Liquids with Care is
If we opt for the wet cleaning method, we ensure that the cleaning solution is sensor-safe and we use as little fluid as possible to avoid residue.
- Apply the Solution to the Swab, Not Directly on the Sensor – this allows for even distribution and prevents pooling of the liquid.
The Art of Patience: We take our time with the cleaning process because precise movements are necessary to avoid smudging or scratching.
Recognizing When Professional Help Is Required can save us a lot of trouble.
If there’s stubborn dirt or if we’re uncomfortable with performing the cleaning ourselves, we seek professional services.
Understanding the Significance of Regular Maintenance could mean the difference between a sensor that lasts and one that fails.
We incorporate sensor cleaning into our routine equipment maintenance to ensure optimal performance and to protect our investment in filmmaking gear.
How To Clean Camera Sensor – Wrap Up
We’ve walked you through the essential steps to ensure your camera sensor remains spotless, safeguarding the quality of your filmmaking.
Remember, patience and the right tools are your best allies in maintaining the integrity of your camera sensor.
Whether you’ve opted for the dry method or the wet method, we’ve shown you how to do it correctly and safely.
Regular maintenance is key, and knowing when to call in a professional can save you from future headaches.
Trust in your newfound knowledge and take pride in the pristine condition of your equipment.
Your camera sensor is now clean, and so are your future projects.
Keep those sensors clean, filmmakers, and your visuals will thank you!
Frequently Asked Questions
What Tools Are Needed For Camera Sensor Cleaning?
To clean a camera sensor, you will need a sensor brush or air blower for dry cleaning, and for wet cleaning, a sensor swab and an appropriate cleaning solution.
A sensor loupe is also helpful to inspect the sensor.
Is It Safe To Clean A Camera Sensor By Myself?
Yes, it is safe if you use the correct tools and follow the detailed steps provided for both dry and wet cleaning methods.
However, caution is advised, and if unsure, professional cleaning services should be considered.
Why Is It Important To Fully Charge The Camera Battery Before Sensor Cleaning?
Fully charging the camera battery ensures that the camera won’t shut down during the cleaning process, which could potentially cause damage to the sensor if the mirror closes unexpectedly on tools.
What Are The Risks Of Improper Sensor Cleaning?
Improper sensor cleaning can cause scratches, smudges, or irreversible damage to the camera sensor, leading to costly repairs or a deterioration in image quality.
Should I Use The Dry Or Wet Cleaning Method For My Camera Sensor?
Start with the dry cleaning method using a sensor brush or air blower to remove loose dust.
If stubborn dirt remains, proceed with the wet cleaning method using sensor swabs and cleaning solution carefully.
How Do I Know If My Camera Sensor Is Clean?
After dry cleaning, use a sensor loupe to check for remaining dust.
If the sensor is not clean, repeat the dry method or consider the wet method if necessary.
When Should I Seek Professional Help For Sensor Cleaning?
If after attempting the correct cleaning procedures you’re still unsatisfied with the results, or if you are uncomfortable with the process, seek professional cleaning services.
How Often Should I Clean My Camera Sensor?
Sensor cleaning frequency depends on how often you use your camera, in what environments you shoot, and how you change your lenses.
Regular maintenance is critical to ensure optimal camera performance.
Just to note, I know with older DSLR Cameras with or without Dust Delete. That often you clean the sensor with the correct swab. But still have dust spots in your photos especially against bright backgrounds like sky in landscape.
So I found a solution for the stuck on spots. As sensor cleaning solutions are fairly weak. And you are really only cleaning the Low Pass Filter on the Sensor. So start with boiling water, add to a small container or cup/glass. Then add 1/4 % dish soap to the boiled water. Stir.
Now while this is still hot. Use your sensor cleaning swab. Dip it in the soapy hot water. Then swab your sensor as usual. But give it a few extra passes with decent pressure. Re-dip swab if needed. You will obviously see the wet soapy residue on the sensor. Then you will need a cup of clean non soapy boiled water.
While hot, Swab your sensor again with a new swab. absorbing the remaining soapy water. Then applying clean hot water. Continue now to wipe dry with another swab or 2. after this, you can now swab your sensor again with the sensor cleaning solution. This works on the most stubborn stuck on spots.
I even start with blowing the sensor with canned compressed air. Held at a distance with minimal force, but better then a rocket blower. This method will require many swabs, But 5-7 swabs is worth it when you have a pristine clean sensor, and crystal clear photos.
Great tips, Scott! Thanks for the contribution here.