
Speed ramping is a term that many professional video editors agree is confusing. It’s a process of speeding up and slowing down the playback speed of a clip in Adobe Premiere Pro.
It’s not the same as changing the frame rate of a clip, which is actually how changes like this are made in other video editors, like Final Cut Pro X.
Tutorials for speed ramping are usually based on the assumption that you already know what it is and are trying to figure out how to do it in Premiere Pro. Many new users have no idea what speed ramping is and even if they do, they’re confused by the way it works.
In this post, we’ll explain why you’d want to use speed ramping, I’ll discuss how it works and I’ll show you how to do it using Premiere Pro.
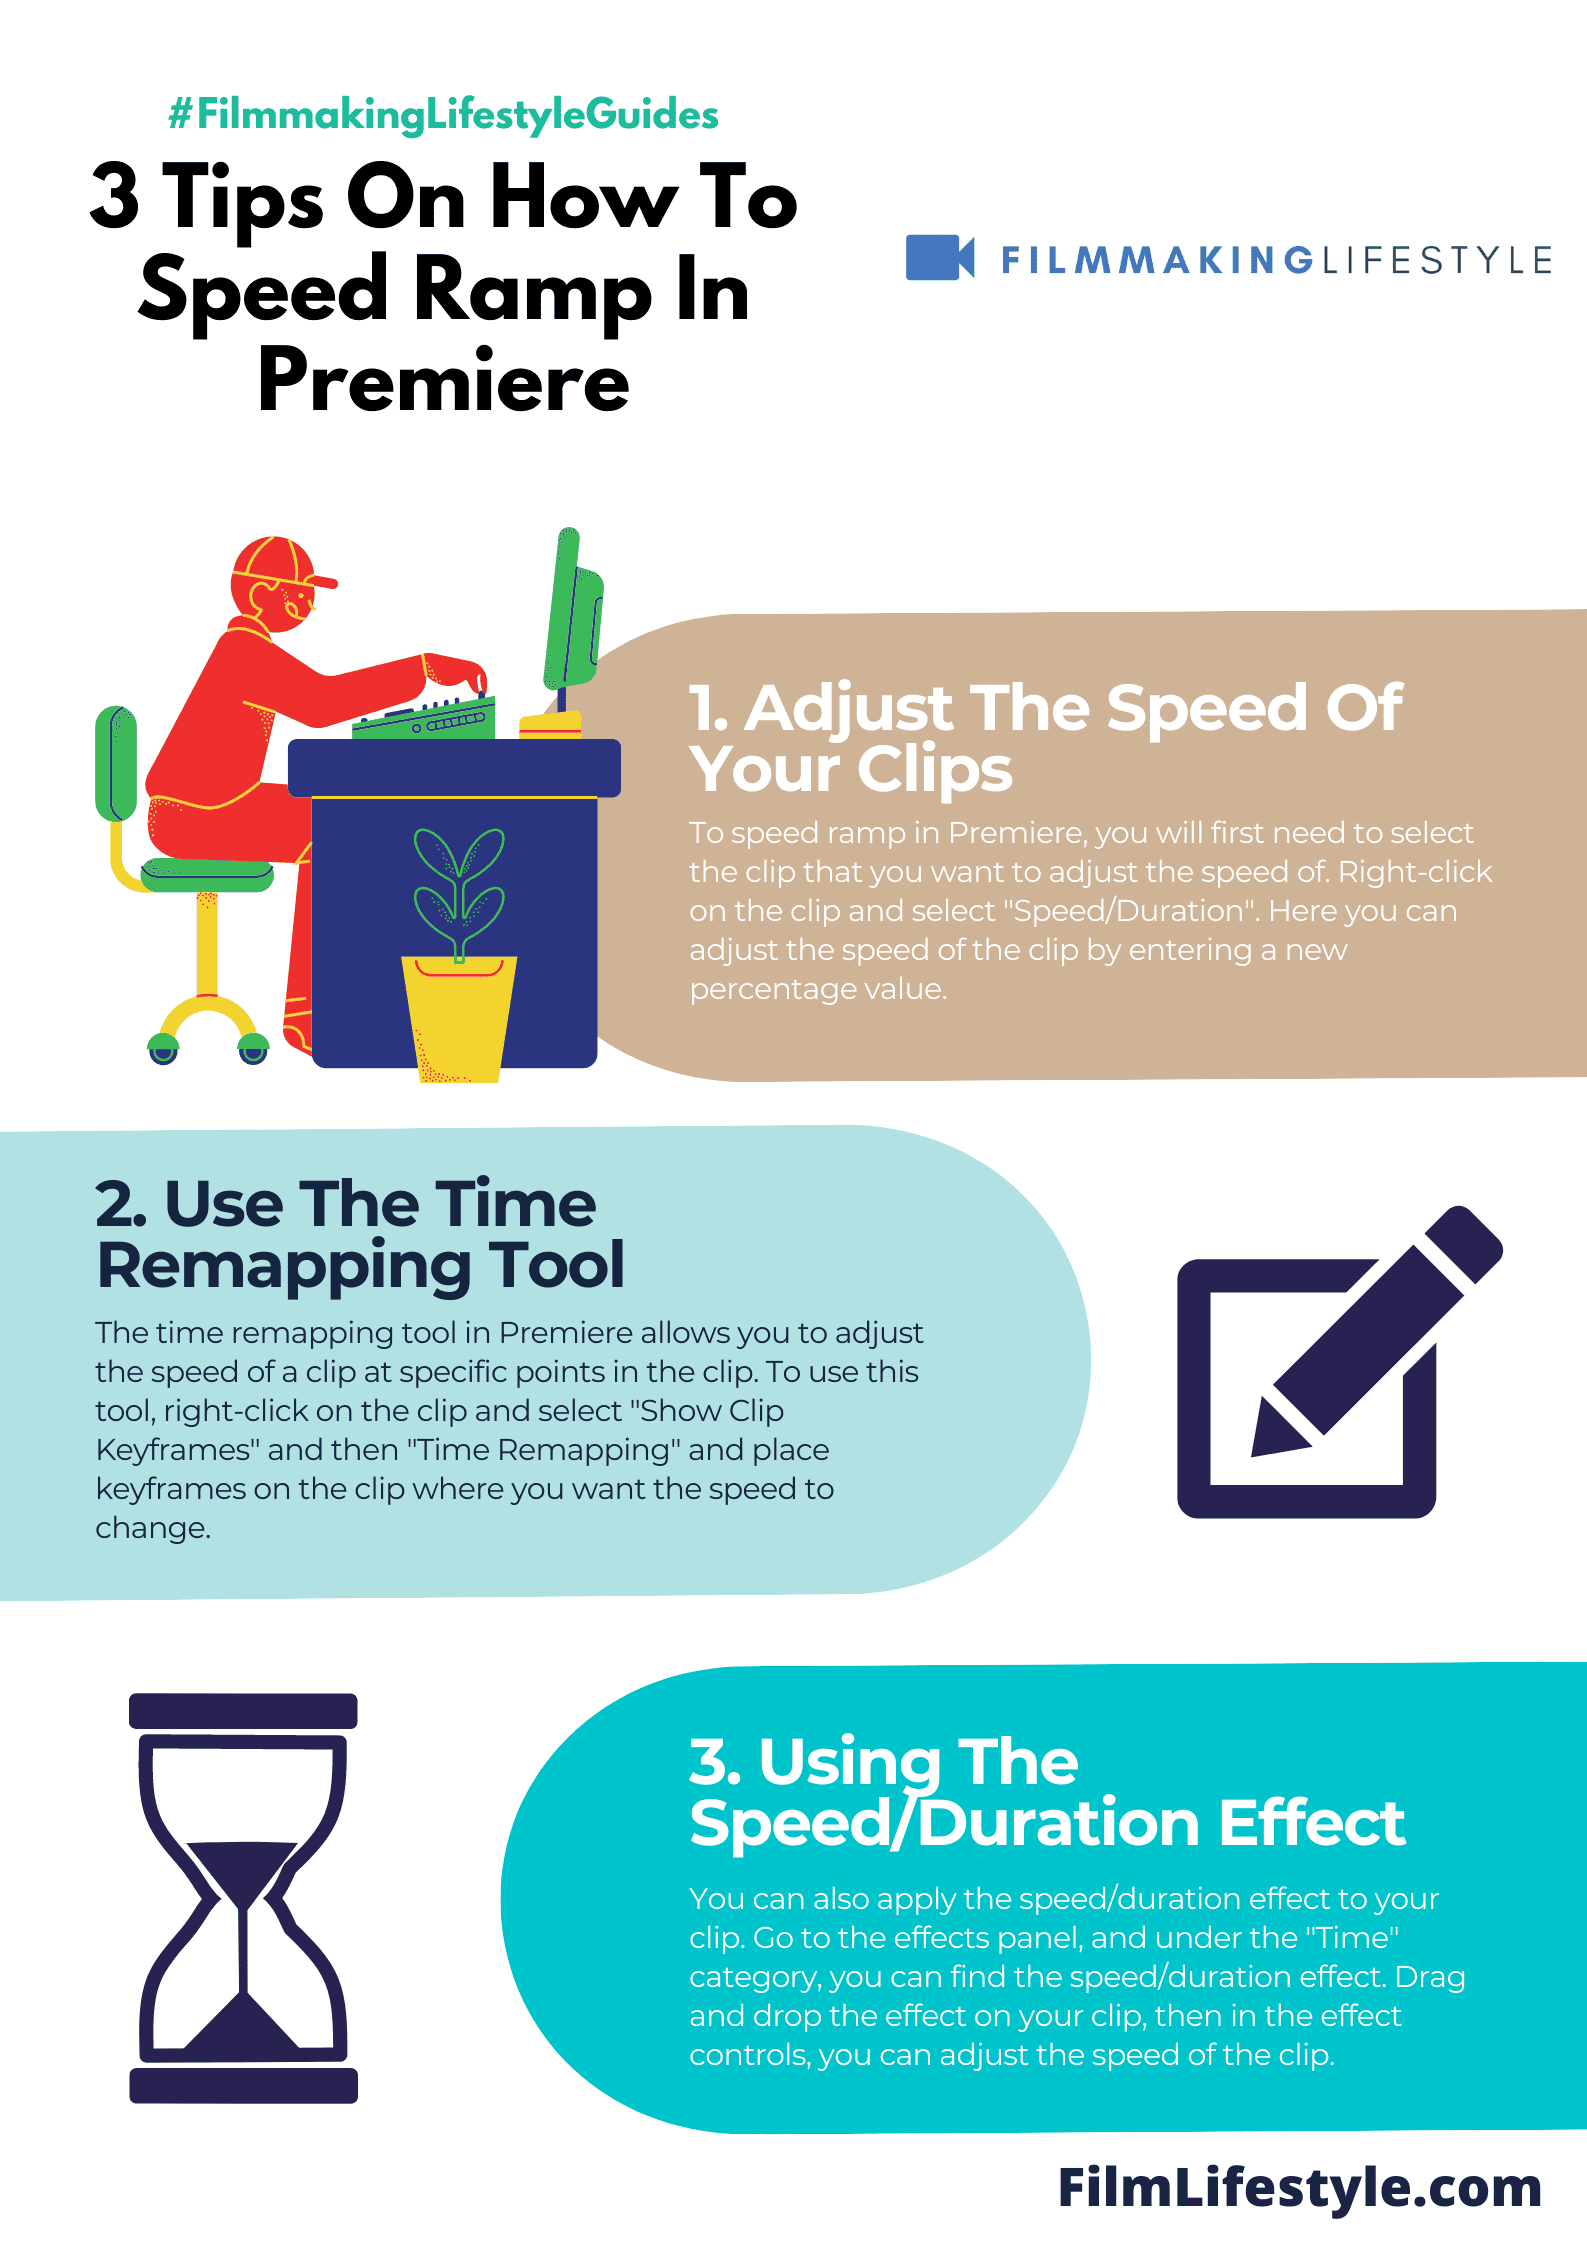
How To Speed Ramp In Premiere
What Is speed ramping in Premiere Pro?
Speed ramping works by speeding up or slowing down a clip over a period of time.
As with many things in Adobe Premiere Pro, it can be done in a variety of ways.
The simplest method is to use the Time Remapping effect. It’s easy to use, but it has a few limitations.
For example, you could make a car fly in super slow motion then jump back to regular speed as it passes by a building, or you could make a person fall and then speed up their impact as they hit the ground.
The main strength of this effect is how simple it is to use. You can drag handles around on the clip to select different parts that will be affected by the change when you apply the ramp, which makes it really quick and easy to get your desired result.
Speed ramping in Adobe Premiere Pro is a dynamic editing technique that can elevate your video’s visual impact.
It’s all about manipulating time to add energy or drama, making mundane footage captivating.
We’ll guide you through the process, from the basics of speed ramping to advanced tips that’ll make your footage pop.

Stick with us, and you’ll master the art of smooth speed transitions in no time.
What Is Speed Ramping?
Speed ramping is an editing technique that has gained popularity for its ability to alter the pacing of a video.
It’s the process of varying the speed of video clips to create smooth transitions from one time frame to another.
This method can profoundly affect the narrative and emotional impact of the scenes.
One of the most impressive applications of speed ramping can be seen in films like Sherlock Holmes or 300.
These films Use speed ramping to amplify action sequences and emphasize dramatic moments.
In Sherlock Holmes, slow-motion is combined with real-time action to give viewers a glimpse into the protagonist’s mind.
It’s crucial for filmmakers to grasp not only the ‘what’ but also the ‘why’ behind using speed ramping.
A well-timed speed ramp can: – Highlight a critical moment in the narrative – Provide a stylistic break in the visual rhythm – Guide the viewer’s attention to specific details
also, speed ramping isn’t limited to action sequences.
It can breathe life into any type of footage, making it more exciting and engaging for the audience.
When applied to mundane scenes, speed ramps can infuse energy and add an unexpected twist to the storytelling.
This technique requires a thorough understanding of your editing software’s capabilities.
In Adobe Premiere Pro, mastering speed ramping involves using keyframes and the speed/duration settings effectively.
Proper use of ease-in and ease-out options creates a seamless speed transition that feels natural and unforced.
Remember that speed ramping isn’t just about fast and slow motion.
It’s about control.
Control over the emotion and tempo of your video.
With practice, you’ll find that speed ramping can transform plain footage into a gripping, dynamic visual experience.
Benefits Of Speed Ramping
Speed ramping has transformed the way we approach video editing.
It introduces a professional flair that keeps viewers engaged from start to finish.
This technique isn’t just aesthetically pleasing; it’s incredibly functional in storytelling.
Enhanced Narrative Control is at the forefront of speed ramping benefits.

Filmmakers use this technique to spotlight crucial moments or seamlessly transit between scenes.
The flexibility offered by speed ramping allows us to sculpt the pacing of a story to our desired tempo.
Speed ramping is not about flashy effects alone.
It’s about strategic emphasis.
We can draw the audience’s attention to an action or emotion by altering the speed, making sure viewers don’t miss the good stuff.
Our control over the flow of time is a game changer.
It empowers us to:
- Highlight a skillful sports maneuver,
- Prolong a character’s expression at a pivotal moment,
- Showcase product features in a commercial.
Through variable playbacks, we induce emotions strategically.
A slow-motion shot can elicit suspense or awe, while accelerated sequences often convey urgency or progression.
It’s exhilarating to dictate the emotional beats of our content with such precision.
Speed ramping also bolsters the Creative Transitioning between shots.
We typically exploit cuts and fades; but speed ramping introduces another dynamic layer.
This technique encourages creative storytelling, allowing us to jump through timelines or zones creatively.
Let’s not forget, speed ramping is about refining the narrative drive in videos.
We craft each segment to ensure that the pace aligns with our artistic intent, enhancing the viewer’s experience.
By masterfully manipulating time, we keep audiences riveted to our visual tales.
Understanding Time Remapping
Time remapping in Adobe Premiere is a powerful feature that enables us to manipulate the speed of our footage.
It’s a flexible tool, allowing for both subtle timing adjustments and dramatic speed variations within a single clip.
To begin time remapping, we access the feature through the Effect Controls panel.
Once there, we can add keyframes to specific points in our clip, marking where we want speed changes to occur.
Adjusting these keyframes allows for precise control over the clip’s pacing.
Gradual speed changes or abrupt shifts can drastically alter the feel and flow of our video content.
To ensure smooth transitions, we often use Bezier handles to finesse the keyframes.
This creates a seamless curve in the clip’s velocity, giving us the freedom to ease in and out of different speeds.
The essence of time remapping in video editing lies in elevating the visual storytelling.
To achieve that, mastering the use of keyframes and understanding the graph editor is crucial.
Key elements we focus on when time remapping include:
- Selecting the right moments to ramp,
- Balancing the pace to maintain viewer engagement,
- Utilizing speed to emphasize or de-emphasize certain segments.
Adobe Premiere’s time remapping functions synergize with other editing tools.
Color correction, audio adjustments, and effects can all be timed around our speed ramping to create a cohesive and impactful narrative.
Our use of time remapping isn’t limited to action-packed sequences.
Dialogue scenes, montages, and even documentaries can benefit from this technique, bringing dynamic rhythm to otherwise static shots.
In our projects, varying time within a shot isn’t just about altering speed.
It’s about crafting a rhythm that resonates with the audience and enhances the narrative arch, keeping viewers connected to our story from beginning to end.
How To Speed Ramp In Adobe Premiere Pro
When it comes to creating dynamic and cinematic videos in Adobe Premiere Pro, speed ramping is a technique that stands out.
It involves varying the speed of video footage to focus on an action or emotion, producing a slow-motion or fast-motion effect that enhances the viewer’s experience.
In Adobe Premiere Pro, speed ramping is an exact science as well as an art.
To get started, we’ll need the clip we want to apply the speed ramp to on our timeline.
From there, right-clicking on the FX badge of the clip will bring up the time remapping menu.
Select the speed option to jump into the speed ramping process.
Adding keyframes at the points where we want the speed to change is crucial – this frames our scene’s beginning and end.
Using the Pen tool or a simple Ctrl-click (or Command-click for Mac users) will let us insert these keyframes precisely.
We can then adjust the speed by dragging the line between keyframes up or down, affecting the clip’s playback speed.
Fine-tuning the speed ramp effect requires smooth, seamless transitions.
This is where Bezier handles are a gamechanger.
We drag these handles to create a gradual change in speed, avoiding jarring jumps.
Their adjustment creates a curve on the speed keyframe which represents the acceleration and deceleration of the video.
The visual appeal of speed ramping isn’t lost on us – it’s a frequent element in films like Inception and Sherlock Holmes.
The slow-motion bullets and whirling camera movements create a memorable impact.
Here are some applications:
- Highlighting a moment,
- Creating tension or anticipation,
- Showing off beautiful cinematography or special effects.
Remember to view the effect in real-time to verify that the result feels natural and achieves the intended emotional impact.
Pairing speed ramping with other editing techniques like color grading or sound effects bolsters the overall storytelling, taking our video from good to great.
Step 1: Importing Footage
Before jumping into the intricacies of time remapping and speed ramping in Adobe Premiere, we’ll need to first bring our footage into the project.
Getting our video files into Adobe Premiere is a straightforward process, but it’s crucial for a smooth editing workflow.
We start by opening Adobe Premiere Pro and selecting ‘Import’ from the ‘File’ menu or using the keyboard shortcut Ctrl+I (Cmd+I on Mac).
This action brings up the import window, allowing us to navigate to the location of our footage.
Once we’ve located the desired video files, it’s as simple as selecting them and clicking ‘Import’ or dragging them directly into the ‘Project’ panel.
Adobe Premiere supports a wide range of video formats, so compatibility is seldom an issue.
It’s good practice to organize our clips into bins within the ‘Project’ panel right from the start – trust us, this step saves time in the long run.
We can create bins by right-clicking in the ‘Project’ panel and selecting ‘New Bin’.
After our footage is neatly organized, we’re ready to take the next step.
We’ll drag the clips onto the timeline to begin crafting our narrative.
Here’s where we can start visualizing where those impactful speed ramps will best serve our story.
Our focus should be on how the footage will flow once the speed changes are applied.
It’s essential to have a solid understanding of the pacing and rhythm we’re aiming for before we proceed to the actual speed ramping process.
With our clips on the timeline and a clear vision in mind, we’re set to move into the nitty-gritty of time remapping in Adobe Premiere.
The seamless transition from standard playback to a slow-motion or fast-forward effect is just around the corner.
Step 2: Creating A Sequence
After we’ve imported our footage and organized it, it’s time to create a sequence.
This is where the magic begins – shaping our raw footage into a compelling narrative or sequence.
In Adobe Premiere, sequences are essentially containers for our edits.
Think of them as a blank canvas where we arrange and manipulate our clips.
To start, we’ll go to the File menu and select New followed by Sequence.
Here’s a crucial step – choosing the right settings for our project.
It’s vital to ensure that our sequence settings match our footage properties to avoid any playback issues or quality loss.
Our sequence settings include tips such as:
- Frame rate,
- Aspect ratio,
- Resolution.
Let’s highlight the importance of the frame rate.
It affects how smooth our footage plays back and is especially important in speed ramping where timing is key.
Aspect ratio determines the dimensions of our video – do we want a cinematic widescreen or a more traditional look?
Resolution is all about the level of detail.
Are we editing in full HD or venturing into the clarity of 4K?
After setting up the sequence, we’ll start to drag our clips onto the timeline.
Here we’re constructing the visual story we envisioned while organizing our footage.
We’ll carefully select the segments of our clips that we plan to speed ramp.
Precision at this stage ensures the impact of our effects feels exactly right.
Next, we’re going to move into the details of applying our first speed ramps.
This requires attention to the timeline and keyframes – something we will dig into further as our editing journey continues.
Remember, the sequence is our foundational work.
Every edit, cut, and effect hinges on how well we structure this base.
Let’s make sure we get it right.
Step 3: Applying Time Remapping
After laying down the sequence foundation, we jump into the essence of speed ramping – time remapping.
Time remapping is a technique in Adobe Premiere that allows us to adjust the speed of any segment within our footage dynamically.
To start, we’ll locate the ‘Effects Control’ panel.
There, we key in on the ‘Time Remapping’ feature and select ‘Speed’.
This unlocks the potential to manipulate time itself within our clips.
Our next move is to add keyframes in strategic parts of the clip.
These keyframes act as markers for where the speed changes will occur.
Precision here is crucial as it defines the fluidity of the ramps.
- Adding the first keyframe marks the beginning of the speed change,
- Adding a second keyframe designates the end of the speed change.
We ensure the ramps are smooth by adjusting the Bezier handles.
This creates a seamless transition from one speed to another.
It’s all about balancing art and precision to maintain the viewers’ immersion.
Tweaking the values between keyframes is our way of dictating the pacing.
Whether it’s a slow-motion effect to emphasize a moment or a quick zip to energize the scene, these decisions are made on a frame-by-frame basis.
By monitoring the ‘Effect Controls’ panel and the ‘Program Monitor’, we keep an eagle eye over the changes.
The graphical representation of our keyframes shows us the acceleration and deceleration of our footage in real-time.
Speed ramping isn’t just about slow or fast.
We can reverse clips, hold a frame, or even add variable speeds within a single clip.
The storytelling power this gives us in films like Inception or The Matrix showcases the technique’s profound impact on cinematic narrative.
Fine-tuning the duration of speed changes is where we refine our storytelling rhythm.
Scaling keyframes closer or further apart tweaks the intensity of speed transitions, eventually shaping the viewer’s experience.
Step 4: Adjusting Keyframes
Once we’ve established our keyframes within the “Effects Control” panel, it’s time for us to fine-tune these points to perfect our speed ramping effect.
We know the goal here is not just to alter speeds but to create a rhythm that complements our visual story.
The key lies in the subtle adjustments that can make or break the fluidity of our video.
Each keyframe’s position determines the starting and ending points of our speed changes, which means precise placement is essential for a natural flow.
Remember, adjusting keyframes is like sculpting time – move them too close, and the effect may feel abrupt; too far apart, and the ramp could drag on tediously.
Here’s what we need to keep an eye on –
- The exact frame where the speed change should start or end.
- The influence each keyframe has on the motion curve, achievable by tweaking the Bezier handles.
- The relationship between keyframes that ensures a smooth transition from one speed to another.
As we adjust our keyframes, the visual representation in the timeline helps us anticipate the impact on our footage.
With practice, we’ll start to feel the pace intuitively, much like a musician feels the beat.
Manipulating time isn’t just a technical process.
In the world of filmmaking, it’s a creative tool as powerful as the lens we choose or the color grade we apply.
Through these adjustments, we’re not only guiding the eye but also the heartbeats of our audience.
By continuously reviewing our adjustments in the “Program Monitor,” we ensure that our intended effect mirrors our initial vision.
And that’s what filmmaking is all about – translating our vision into an experience that resonates with our viewers.
Engaging the audience is a dance – and like any good dance, it’s all in the timing.
With practice, the rhythm of the speed ramp becomes second nature, a skill we refine with each project to tell stories that move our audience, quite literally.
Step 5: Transition Techniques
With keyframes placed, it’s time to jump into transition techniques.
These methods help us blend speed ramps seamlessly into our project.
Implementing Transition Effects can help mask the acceleration or deceleration.
The use of effects such as Cross Dissolve or Film Dissolve introduces a gentle passage from one speed to another.
Another effective technique involves Narrative Matching.
Here’s what we focus on:
- Matching action – ensuring that the movement in both scenes corresponds,
- Matching rhythm – aligning the beats or emotional pulses of the scenes.
We can also employ Audio Cues to complement the visual transition.
A carefully chosen sound effect or music cue can drastically enhance the perception of speed change.
Leveraging Opacity Keyframes alongside speed keyframes offers a multilayered approach.
Fading visuals in and out can create a compelling lead in or out of high-velocity segments.
Savvy editors sometimes use J-Cuts and L-Cuts.
This technique lets the audio from the following or preceding clip enter before the visual does.
It can hint at the upcoming pace before viewers see it.
We integrate these techniques to ensure the audience experiences the story as we envisage.
The goal is to keep them engaged and invested in our narrative flow.
Advanced Tips For Speed Ramping
When refining speed ramps, it’s crucial to consider the flow of the entire sequence, not just the isolated effect.
We look for ways to integrate speed changes that compliment the story telling.
focusing to pacing, we ensure speed ramps contribute to the visual narrative rather than distract.
Dynamic linking to
Motion graphics and visual effects created in
This workflow elevation can transform a simple speed ramp into a more complex, polished sequence.
We Use frame blending options to smooth out any jarring transitions.
Frame sampling, frame blending, and optical flow are options that can improve the quality of our speed ramps.
Here’s what each method offers –
- Frame Sampling: Repeats or removes frames as needed.
- Frame Blending: Creates a blend of frames for a smoother look.
- Optical Flow: Generates new frames by analyzing the motion between frames, best for complex motion.
Experimentation with speed ramping can lead to unique stylistic choices.
Films like The Matrix revolutionized this technique, showcasing its potential.
We apply these concepts while keeping our project’s aesthetic and story needs in mind.
Color grading can subtly influence the perception of speed.
We sometimes alter color hues and contrasts in segments of our speed ramps, enhancing the audience’s emotional response.
This technique can subtly signal time manipulation without being overly obvious.
Nested sequences enable us to apply effects to multiple clips at once.
We streamline our workflow by adjusting entire sections of our timeline where speed ramps are prevalent.
This approach saves time and maintains consistency across the sequence.
Remember, the key to advanced speed ramping is a combination of creativity and technical know-how.
We refine our skills through practice, study, and the courage to experiment with new techniques.
With these advanced tips, we’re ready to take our speed ramping to the next level and create captivating, immersive content.
How To Speed Ramp In Adobe Premiere – Wrap Up
We’ve armed you with the essentials to master speed ramping in Adobe Premiere, blending creativity with precision to elevate your video edits.
Remember, it’s all about the rhythm and pacing of your visual narrative.
Don’t hesitate to explore
Embrace color grading to add depth to your speed variations and keep your workflow efficient with nested sequences.
With these tools at your disposal, we’re confident you’ll craft compelling, dynamic content that captivates your audience.
So go ahead, experiment, refine, and let your creativity soar!
Frequently Asked Questions
What Is Speed Ramping?
Speed ramping is a video editing technique used to vary the speed of a clip, often creating a slow-motion or fast-motion effect that enhances the storytelling by focusing on particular moments.
Why Is Considering The Flow Of The Sequence Important In Speed Ramping?
Considering the flow ensures that the speed changes complement the storytelling, making the transitions smooth and maintaining the viewer’s engagement throughout the sequence.
How Does Dynamic Linking To After Effects Benefit Premiere Projects?
Dynamic linking allows seamless integration of motion graphics and visual effects from
What Are The Different Frame Blending Options Available For Speed Ramps?
Frame blending options like frame sampling, frame blending, and optical flow are methods to improve the smoothness and quality of the speed ramp transitions, especially in slow-motion effects.
Can Color Grading Influence The Perception Of Speed In A Video?
Yes, color grading can significantly influence the viewer’s perception of speed and mood, adding another layer of depth and emotion to the speed ramping effect.
What Is The Advantage Of Using Nested Sequences In Speed Ramping?
Nested sequences streamline the speed ramping workflow by allowing editors to apply effects and adjustments to multiple clips at once, thus simplifying the editing process and saving time.