
In the bustling world of e-commerce, product photography is the silent salesman that can make or break a sale.
It’s a specialized form of photography aimed at presenting products in the most attractive way possible, capturing the attention of potential buyers.
We’ll jump into the essentials of product photography, from the importance of lighting and angles to the impact it has on consumer behavior.
Stick with us to uncover the secrets behind those stunning images that make you want to click ‘add to cart’.

Importance Of Product Photography
In the e-commerce world, product photography can be the difference between a conversion and a bounce.
We understand that our feature images act as storefronts, beckoning customers to take a closer look.
With the right imagery, we translate the tangible qualities of a product through the screen, allowing customers to imagine ownership effortlessly.
High-quality product photos indicate professionalism and brand credibility.
Our experience shows that customers often associate the quality of a product’s image with the quality of the product itself.
By investing in exceptional product photography, we’re affirming our commitment to quality at every touchpoint.
Here are some key points that underscore the importance of product photography in e-commerce:
- Boosts conversion rates by providing clear, attractive visual information,
- Reduces return rates by accurately representing products,
- Enhances customer trust through professional presentation,
- Plays a vital role in branding and storytelling.
Attracting the right audience is crucial – and our product photos do just that.
They’re not just pictures; they’re strategic business tools.

Through careful composition and lighting, we emphasize features that resonate with our target demographic.
This targeted approach helps us to connect with our audience and cater to their specific preferences and needs.
Our approach to product photography goes beyond mere documentation.
We use visuals to evoke emotions and convey a lifestyle that aligns with our brand.
It’s about creating an aspirational image that customers want to buy into.
By showcasing products in a context that speaks to our audience, we craft scenes that are much more than just visually appealing – they’re also incredibly persuasive.
Lighting Techniques In Product Photography
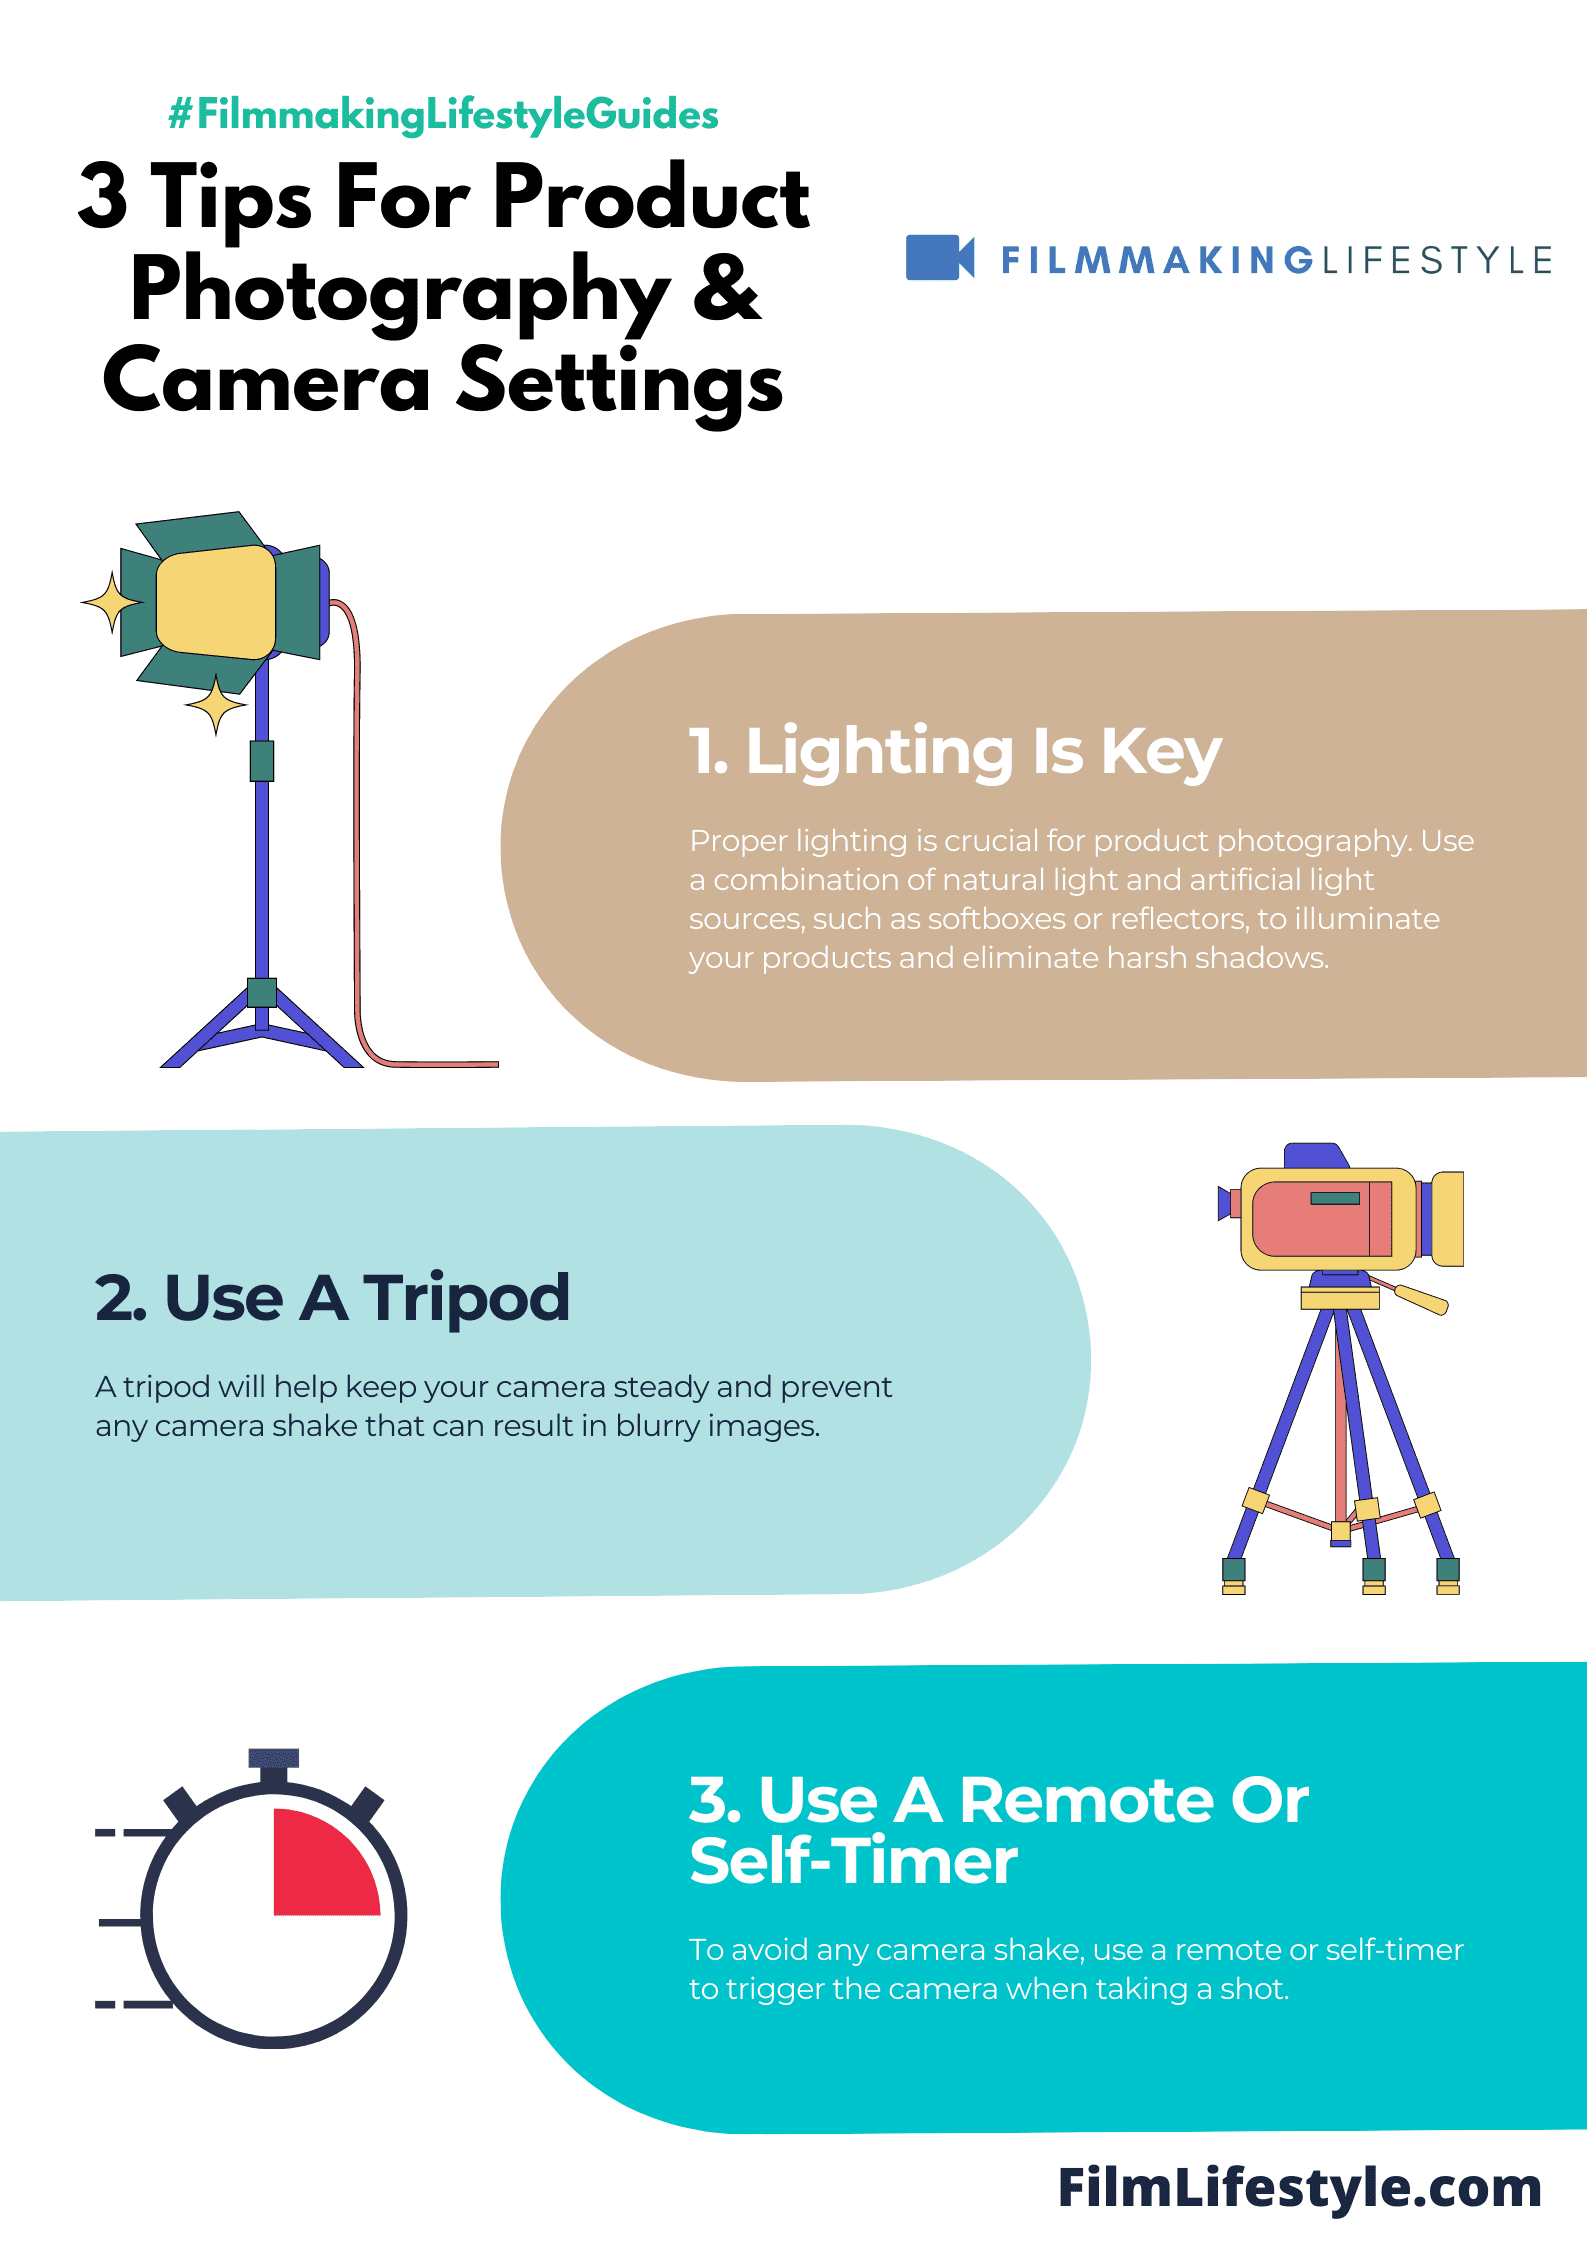
When we jump into the realm of product photography, we encounter a critical component – lighting.
It’s the backbone that can either elevate a simple image to the height of artistry or leave it flat and uninspiring.
Proper lighting helps to accentuate the product’s best features, creates depth, and brings out accurate colors.
Among the various techniques we use:
- Soft lighting – diffuses light, reducing shadows and contrast.
- Achieved with umbrellas or softboxes.
- Ideal for a natural look and for products that reflect a lot.
- Hard lighting – creates distinct, hard shadows.
- Done with direct lighting or spotlights.
- Perfect for accentuating texture and details.
Natural light can deliver a clean, pure aesthetic that many brands strive for.
This technique, often used in lifestyle product shots, relies on the sun as the main light source and is unpredictable yet cost-effective.

We usually shoot near windows or outdoors during the golden hours for that soft, warm glow.
But, we are always at the mercy of weather changes, which calls for a flexible shooting schedule.
Conversely, artificial lighting grants us complete control.
We easily manipulate various light sources such as LED panels or flash strobes to achieve the desired effect, no matter the time of day.
This predictability is vital for consistency across multiple products and in line with the brand narrative.
Highlighting and rim lighting are advanced techniques that give products a three-dimensional feel on a flat image.
We carefully position smaller light sources to create a subtle edge or highlight that separates the product from the background, adding drama and attention to detail.

Split, loop, Rembrandt, and butterfly lighting are portrait photography staples that also serve us well in product photography.
Each offers a unique way to cast shadows and shape the product, drawing the viewer’s eye to strategic spots.
We recognize that mastery of lighting is an art form in itself, one that dictates the mood, texture, and overall impact of the product imagery.

By understanding and harnessing these techniques, we aim to showcase every product in its best light, literally.
Angles And Perspectives In Product Photography
When we jump into the realm of product photography, the angles and perspectives we choose have the power to transform the ordinary into extraordinary.
It’s not just about snapping a photo; it’s about telling a story and evoking emotion, all through the careful selection of vantage points.
For instance, a bird’s-eye view can offer a comprehensive layout of a product, while a worm’s-eye view might highlight a product’s stature and strength.
The right perspective can also communicate the intended use or audience of a product.

Here are a few perspectives and what they can convey:
- Eye-level shots create a sense of familiarity and are great for connecting with the audience.
- High-angle shots can make products look smaller or more accessible, inviting viewers to take a closer look.
- Low-angle shots lend a sense of grandeur, making products appear larger than life.
Our expertise tells us that the most captivating product images often come from experimenting with unconventional angles.
Think of the way Dutch angles can imbue a sense of dynamism to the image or how a three-quarters view might reveal intricate details of a product that a front-on shot would miss.
Products aren’t stationary objects; they’re designed to interact with the world.
By playing with various angles, we give them a stage to perform.
Whether it’s the sleek silhouette of the latest tech gadget or the soft curves of a handcrafted vase, every product has its best side.
It’s our job to find it and showcase it through a lens that does it justice.
In the ever-evolving landscape of e-commerce, stellar product images can make or break customer interest.
That’s why we emphasize mastering the art of angles and perspectives, ensuring that each product we capture is viewed in its best possible light.
How Product Photography Influences Consumer Behavior
Understanding the impact of product photography on consumer behavior is crucial for any e-commerce business.
High-quality images can significantly enhance customer engagement and boost sales.
Here’s how visually compelling product photos influence shopping habits.
The first touchpoint for online shoppers is often a product image.
Before reading descriptions or reviews, consumers react to visuals.
A well-crafted photo captures attention, imbuing the product with desirability and highlighting its best features.
These initial reactions are powerful drivers for purchase decisions.

Beyond capturing attention, product photography has the ability to:
- Set a brand’s tone and identity,
- Communicate product quality and value,
- Evoke an emotional response leading to increased brand loyalty,
- Illustrate product uses and benefits clearly and effectively.
It’s the emotional connection that often tilts the scales in favor of one product over another.
When we create images that resonate on a personal level, we’re tapping into a potent psychological tool.
Consider the use of lifestyle images in which products are showcased within a relatable scene.
These set the stage for the consumer to picture themselves using the product, creating a sense of ownership before the purchase is even made.
Images play a vital role in managing customer expectations as well.
Through clear, detailed photos from multiple angles, we provide a sense of transparency that builds trust.
Accurate representations reduce returns and increase satisfaction because customers know exactly what to expect.
Our expertise in photography ensures that every image is not just a static picture but a persuasive element of the overall marketing strategy.
By harnessing the power of product photography, we guide consumer behavior subtly and effectively, crafting an online experience that mirrors the confidence and satisfaction of in-store shopping.
Secrets Behind Stunning Product Images
Crafting stunning product images isn’t simply a matter of pointing and shooting with a camera.
It involves a blend of art and science that, when executed correctly, can significantly enhance the appeal of your products.
As photography experts, we’re excited to pull back the curtain and share the lesser-known tactics we use to create those captivating images that stop consumers in their tracks.
First, lighting is the cornerstone of impactful photography.
We understand that the right lighting can make or break a photo.
We often use a combination of natural light for softer shots and studio lighting for a more dramatic effect.
Consistency in lighting is key across all product images to maintain a cohesive look that aligns with the brand identity.
Next, the composition of a product shot is vital.
We’re mindful of the rule of thirds, leading lines, and the use of negative space to draw the viewer’s eye directly to the product.
Here’s what we pay attention to – – The rule of thirds to position the product dynamically within the frame
- Leading lines to guide the viewer’s gaze towards the product,
- Negative space to give the product breathing room and highlight its features.
Besides, the post-production process is where good product images become great.
Through meticulous editing, we are able to correct colors to reflect the product accurately and enhance details that may be overlooked at first glance.
Subtle retouching is often necessary to eliminate distractions and ensure the product looks its best.
Props and context play an underrated role in product photography.
We add elements that complement the product’s personality without overshadowing it.
These carefully selected props can tell a story and evoke the lifestyle associated with the brand, providing customers with a relatable experience.
What Is Product Photography – Wrap Up
We’ve unpacked the artistry and technical know-how that elevates product photography from mere snapshots to persuasive visual stories.
Remember, it’s the seamless blend of lighting, composition, and thoughtful editing that will make your products shine and resonate with customers.
By mastering these elements, we can create images that not only look professional but also embody the essence of our brand.
Let’s harness the power of exceptional product photography to captivate our audience and eventually, drive sales.
Frequently Asked Questions
What Is The Importance Of Product Photography In E-commerce?
Product photography is crucial in e-commerce as it helps create first impressions, conveys the quality of the product, and assists customers in making informed purchase decisions.
What Are The Key Techniques To Create Stunning Product Images?
The key techniques include the use of proper lighting, strategic composition, professional post-production editing, and incorporating relevant props to add context and enhance the product’s appeal.
How Does Lighting Affect Product Photography?
Lighting can dramatically affect the look and mood of the product shot.
It helps highlight the product’s features, adds depth, and can influence the buyer’s perception of quality.
What Role Does Composition Play In Product Photography?
Composition involves arranging elements in the frame in a way that is aesthetically pleasing and directs the customer’s eye to the most important parts of the product.
Why Is Post-production Editing Important?
Post-production editing is important to correct imperfections, adjust colors to reflect the product’s true appearance, and ensure that the images are consistent with the brand’s visual identity.
Can Props Be Used In Product Photography, And Why?
Yes, props can be added to product photography to provide context, show scale, or illustrate how the product is used, thereby making the image more relatable and appealing to customers.
amazing post. I am a professional Graphic Designer and wanna be a photographer too.
Good luck, John!
Thanks for a marvellous posting! I really enjoyed reading it. I will be sure to bookmark your blog and will eventually come back later on, you have posted a trustworthy blog keep sharing.
Thanks for the comment! Appreciate it.
Superb writing Matt. I got answers to almost all of my questions about the camera setup for product photography. Thanks a lot for the post
Thanks for the comment, Nelsea – appreciate it!
Thanks for sharing this article. It is very informative for me.
No probs, thanks!
This amazing blog. Thanks for sharing such valuable photo editing tips. Excellent explanation and I appreciate it. It’s beneficial for photo editing.
Thanks! Appreciate the comment.
Hello Matt, I am looking low lighting effect of DSLR camera can you share with me a complete guide of this. I love read your blog and best wishes to you.
Hi Alec,
Thanks for the kind words.
We have a couple of guides on this:
https://filmlifestyle.com/best-low-light-camera/
https://filmlifestyle.com/best-low-light-dslr/
Hope that helps!
Recently i have bought nikon D3500 and your article is help me lot. Thanks for share it,
Thanks, Kaif. Appreciate it.
Good luck with the Nikon D3500!
Sweet blog! I found it while surfing around on Yahoo News. Do you have any suggestions on how to get listed photo retouching services News in Yahoo? I’ve been trying for a while but I never seem to get there! Many thanks
Nice to read your informative post, thanks
Thanks, Jahid.
Thanks for sharing such beautiful information with us on product photography.
Thanks, Jolene.
This is a great article! I just started my own product photography journey and I am totally taking a lot of your advice to heart! Thank you so much!!
Thanks Oliva.
Thanks for sharing valuable information for photography and photo editing. I really enjoyed reading it, you might be a great author.
Thanks, appreciate it.
This was a really great introduction to product photography.