
Screen record on Mac with QuickTime Player. You can use QuickTime Player to record a portion of your screen, an entire screen, or a selected window.
It’s also possible to record your voice, a video camera, or your Mac’s audio.
- Open QuickTime Player (it’s in the Applications folder of your Mac).
- Choose File > New Screen Recording and click to view a menu of options for where to record from: To record the entire screen, click anywhere on the screen.
- To record a portion of the screen, drag to select an area. To move the entire selection, drag from within the selection. To cancel making a recording without saving it, press the Esc (Escape) key before clicking to record.
- To start recording, click anywhere on the screen. While you’re recording, you can open menus and switch between apps — anything you do is recorded.
- A red banner appears across the top of your screen when QuickTime is recording.
- To pause recording, press Command-Control-Esc (Escape). Click Resume to resume recording if you paused it earlier. The red banner remains across the top of your screen until you stop recording.
How To Screen Record On Mac
How to Screen Record On Mac
Screen recording is the process of capturing a video of your computer screen, usually from within a program. Screen recording can be done with free software or apps and is an easy way to create videos for YouTube.
Screen recording allows you to capture the whole screen and even parts of the desktop. You can record your screen and then edit your recordings later in Adobe Premiere Pro or Final Cut Pro X.
There are many reasons why you may want to record your screen on Mac, but here are some of the most popular:
Creating tutorials by showing off how something works or what it does
Testing software before putting it live
Trying out new programs while they’re still in beta versions
Creating promotional videos for your business or products
Ever needed to capture something on your Mac’s screen?
Screen recording on a Mac is a breeze, and we’ll show you how it’s done.
From creating tutorials to saving video calls, we’ll guide you through the simple steps to record your screen with audio.

Whether it’s for work or personal use, knowing how to screen record can save you time and hassle.
Stick with us, and you’ll be a screen recording whiz in no time, with all the tips and tricks at your fingertips.
Why Screen Recording On Mac Is Useful
Screen recording on a Mac isn’t just a party trick.
It’s a powerful tool that enhances productivity and creativity in various professional settings.
From educational content to business presentations, screen recordings convey information in a dynamic and engaging manner.
Businesses can use screen recordings to showcase software tutorials or walk customers through troubleshooting steps with ease.
In the world of film and video production, capturing on-screen footage can be invaluable during the post-production process.
Directors and editors can record editing software tutorials to Help knowledge-sharing within the filmmaking community.
Screen recordings can also be repurposed for content marketing strategies.
By creating how-to videos or software reviews, we can offer value to our audience while driving traffic to our site or social media platforms.
For workflows that involve multiple stakeholders, screen recordings can succinctly communicate project updates or design changes.
This eliminates the need for lengthy emails and ensures everyone is on the same page.
Here are some specific instances where screen recording on a Mac shines –
- Crafting detailed video tutorials for complex editing techniques,
- Recording a software bug to assist with remote troubleshooting,
- Capturing live streams or webinars for later review.
By integrating screen recording into our digital toolkit, we set ourselves up for enhanced communication and a richer, more productive creative process.
Whether it’s creating content or collaborating with peers, screen recording on a Mac is an indispensable asset.
How To Access The Screen Recording Tool
Accessing the screen recording tool on a Mac is a simple process.
We’ll need to use the Screenshot toolbar, which is part of macOS’s native utilities.
To open the Screenshot toolbar, we’ll use a quick keyboard shortcut.
We need to press Command + Shift + 5, and the toolbar will appear on the screen with options for capturing screenshots and video recordings.
The toolbar is user-friendly and offers a range of recording options.
We can choose to record the entire screen or select just a portion of it for a more focused capture.
Quick Time Player also provides screen recording functionality.
We can find it in the Applications folder, and once open, we select ‘File’ and then ‘New Screen Recording’.
Here are the steps to record using Quick Time Player:
- Open Quick Time Player from the Applications folder.
- Navigate to the menu bar and select ‘File’ followed by ‘New Screen Recording’.
- Click on the record button to start capturing the screen.
Choosing the right tool depends on our project requirements.

For quick captures, the Screenshot toolbar is efficient, but for more control, like recording audio along with the screen, Quick Time Player is the better choice.
While recording, we can also toggle on the microphone to include audio commentary.
This feature is ideal for tutorials or walk-through videos in film production or digital marketing content.
Optimizing the settings before recording ensures high-quality output.
We can adjust the microphone levels and select the save location for easy file management.
Remember, practicing with these tools can greatly enhance our screen recording skills.
Whether we’re creating behind-the-scenes content for a film or crafting instructional videos, mastery of these tools allows us to capture and share our on-screen activity effortlessly.
Setting Up Before You Begin
Before diving into the nuances of screen recording, it’s crucial to set up your Mac to ensure a seamless process.
We need to pay attention to several key aspects – these will be the cornerstone of producing high-quality recordings that can add value to any professional project, whether it’s an educational tutorial or a snippet of a film production.
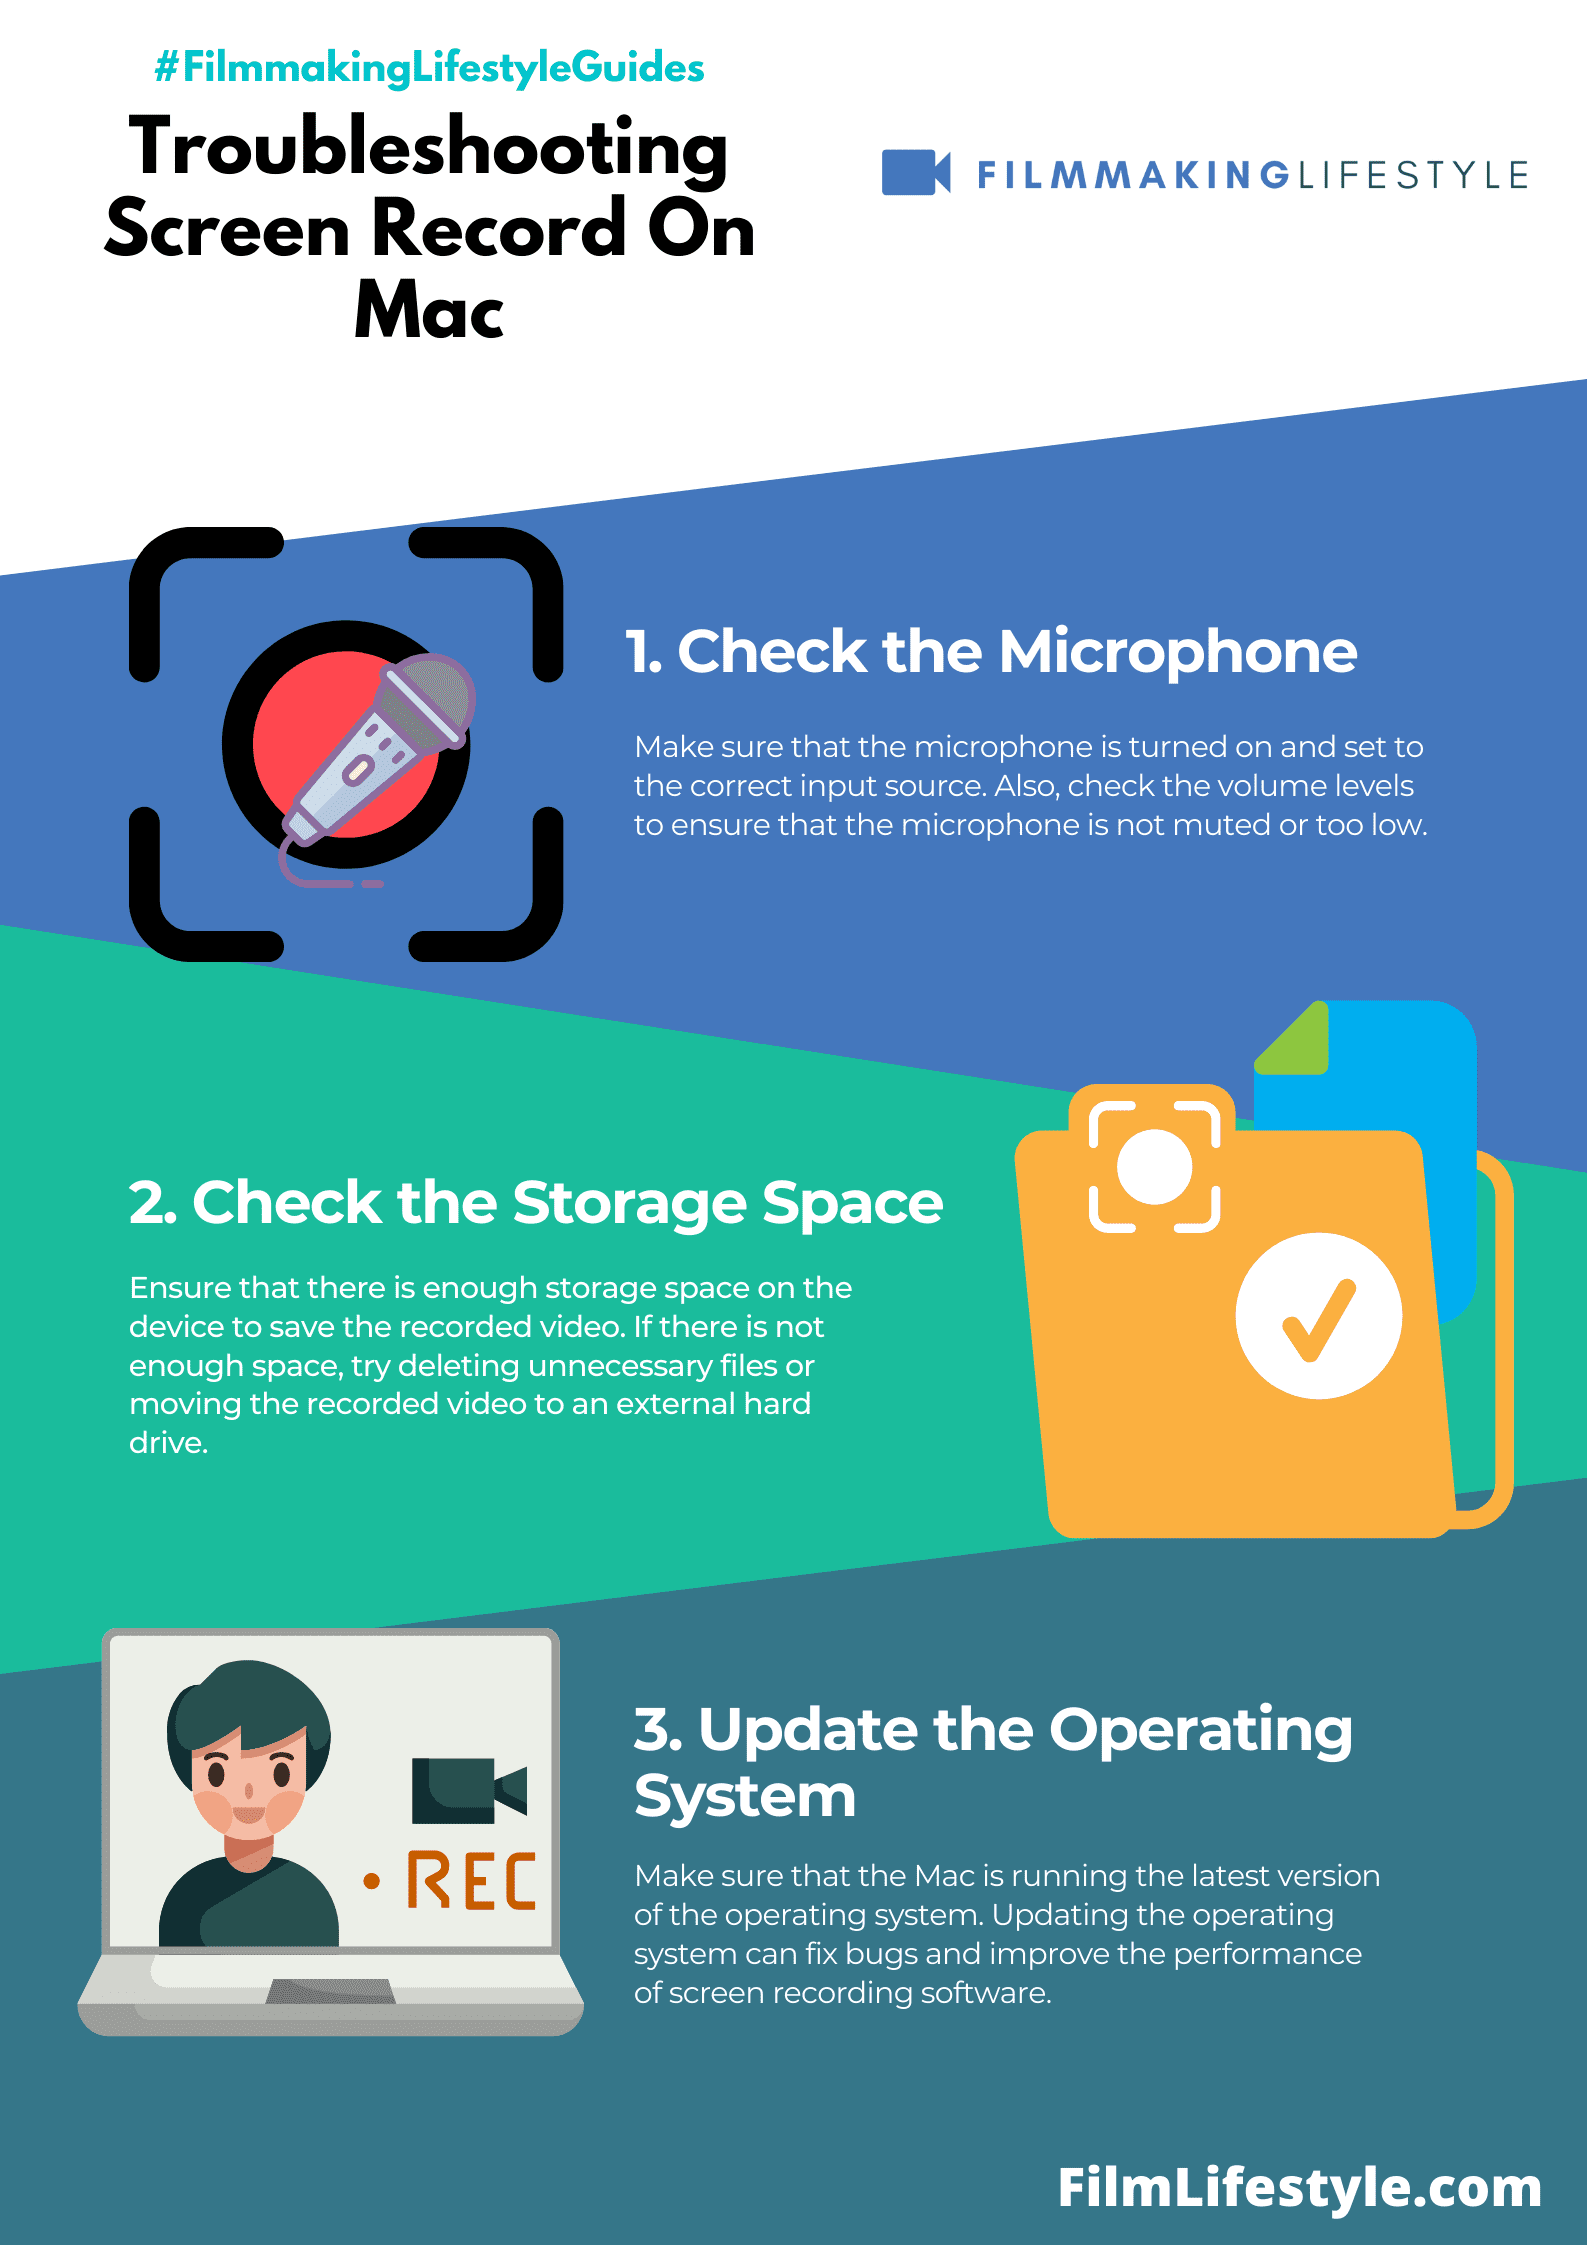
Storage space is vital.
High-resolution screen recordings can consume significant disk space.
We’ll want to make sure there’s ample room on our Mac to accommodate the files we plan to create.
It’s a good practice to clean up unnecessary files and perhaps invest in an external drive for additional storage.
Audio settings are another critical area.
If our screen recording includes a voiceover or captures system sounds, the right audio input selection is
We’ll check our input settings and test to confirm that the audio records clearly and at the desired volume.
For video clarity, the screen resolution plays a role.
We’ll adjust our screen resolution to match our recording requirements.
This ensures the end-product isn’t unnecessarily large or lacking detail.
When it comes to process efficiency, knowing the shortcuts can save us time:
- Use
Command + Shift + 5to access the Screenshot toolbar instantly. - Press
Optionsduring screen recording setup to adjust preferences quickly.
Finally, remember the ambiance.
Natural light fluctuation can impact the visual consistency in our recordings.
We’ll close blinds or use consistent artificial lighting to maintain a steady appearance throughout the recording.
Screen recording on a Mac is a straightforward affair, but paying heed to these preliminary settings will enhance our experience and the quality of our work.
By taking the time to properly configure our workspace and Mac settings, we’re positioning ourselves to capture our creative endeavors effectively and efficiently.
Recording Your Screen
Once we’ve ensured that our Mac is set up properly, we can begin the process of screen recording.
This is a straightforward task, but there are several steps we must follow to capture high-quality video.
Starting The Screen Recording
We’ll first need to open QuickTime Player, found in the Applications folder.
Then we select ‘File’ at the top menu and choose ‘New Screen Recording’.
This will bring up the screen recording interface.
Selecting The Recording Area
QuickTime gives us two options for screen recording – we can record the full screen or just a portion of it.
If we’re creating a tutorial or showcasing software, capturing the full screen might be best.
For more focused content, like highlighting a specific feature, selecting a portion is ideal.
- To record the full screen – click anywhere on the screen after selecting ‘New Screen Recording’.
- To record a portion – drag to select the area we want to record then click ‘Start Recording’.
Customizing The Recording Settings
Before starting, it’s essential to adjust the settings to suit our project’s needs.
The options include:
- Recording the entire screen or just a selected portion.
- Using the built-in microphone or an external mic for better audio quality.
- Showing or hiding the mouse cursor to direct viewer focus.
Remember to choose the microphone wisely, as good audio is crucial for film and video projects.
Initiating The Screen Capture
With the area selected and settings customized, we’re ready to start recording.
We can click ‘Record’ and carry out the actions we want to capture.
Throughout recording, we must keep in mind the shortcuts we’ve learned – they streamline the process and make sure we don’t waste time clicking through menus.
By now, we’re capturing our screen effectively, creating content that’s visually clear and well-paced.
Our preparation in the setup stage pays off, ensuring the recording goes smoothly, without the need to stop and make adjustments.
Through these steps, we’re on our way to producing professional-level screen recordings that can be used for a wide range of purposes, from filmmaking to digital marketing.
Tips For A Successful Screen Recording
When embarking on a screen recording session, certain strategies can significantly enhance the final outcome.
Appropriate lighting and minimizing background noise are critical, yet often neglected elements that can define the quality of your tutorial or presentation.
Audio clarity is
We recommend investing in a high-quality microphone to ensure your voice is crisp and clear.
Ambient noise can be very distracting, so it’s helpful to record in a quiet environment.
A tidy desktop reflects professionalism and keeps viewers focused.
Before hitting the record button, close unnecessary applications and clean up your desktop icons.
A clutter-free background allows your content to take center stage.
Ensure your script is well-prepared and rehearsed to avoid unnecessary pauses and filler words.
This preparation doesn’t just smooth out your delivery – it also makes the editing process much more straightforward.
To further refine your recording, consider these additional tips –
- Use a secondary monitor to handle your script and additional resources – Customize cursor effects to highlight important actions – Apply keyboard shortcuts to start, pause, and end the recording efficiently.
Remember that practice makes perfect.
The more you record, the more comfortable you’ll become with the process and the more polished your videos will appear.
By following these guidelines and using the right tools and techniques, you’re well-equipped to produce high-quality screen recordings that captivate your audience.
Whether it’s for an instructional video, a product demo, or a creative project like a vlog, the attention to detail will pay dividends in your viewer’s experience.
Editing And Saving Your Screen Recording
Once you’ve captured the footage on your Mac, it’s time to polish it.
Editing is crucial – it’s where you trim the excess, add important annotations, and enhance the overall presentation of your content.
Most Macs come with iMovie, a user-friendly tool that’s sufficient for basic editing needs.
For more advanced features, professional software like Final Cut Pro offers a wide range of options.
After editing, saving and exporting your video is the next step.
You’ll want to make sure the file format is compatible with your planned usage.
QuickTime, which is built into macOS, lets you save screen recordings in various formats such as MOV, MP4, and M4V.
Consider compressing your video to save space without significantly losing quality; tools like HandBrake can optimize your video for web uploads or storage.
Organizing Your Files should not be overlooked.
Create clear file names and proper storage locations for easy access and reference:
- Use descriptive and consistent file naming conventions,
- Store in dedicated folders on your Mac or cloud storage,
- Backup regularly to prevent accidental loss.
finally, sharing your screen recordings can be done directly from your Mac.
The macOS Share menu allows you to distribute your video across different platforms – from email to social media.
If you’re planning to use the video professionally, you might need a host like Vimeo or YouTube to ensure it’s viewed at its best quality.
Remember, these processes are integral to the workflow in filmmaking.
Every step from capturing to sharing your screen recordings should be handled with care to ensure the final product reflects the quality and professionalism of your work.
Keep your audience engaged with seamless editing and proficient file management.
How To Screen Record On Mac – Wrap Up
We’ve walked you through every step needed to capture and finesse your Mac screen recordings.
Remember, the right tools and a bit of planning go a long way in creating videos that stand out.
Whether it’s for tutorials, presentations, or sharing content, we’re confident you’ll produce top-notch recordings that reflect your expertise.
Now that you’ve got the know-how, it’s time to start recording and let your creativity shine.
Happy screen recording!
Frequently Asked Questions
What Tools Are Recommended For Editing Screen Recordings On Macos?
For editing screen recordings on macOS, the article recommends using iMovie or Final Cut Pro as they offer a range of editing features and are compatible with macOS.
What File Formats Are Suggested For Saving Screen Recordings?
It is suggested to save screen recordings in compatible formats such as MOV, MP4, or M4V to ensure they work across different devices and platforms.
How Should I Organize My Screen Recording Files?
You should organize your screen recording files by giving them clear, descriptive names and storing them in proper locations for easy access and management.
What Is The Recommended Method To Distribute Screen Recordings?
The macOS Share menu is recommended for distributing your screen recordings.
For professional use, uploading the recordings to platforms such as Vimeo or YouTube is suggested.
Why Is It Important To Handle The Screen Recording Process With Care?
Handling every step of the screen recording process with care is important to ensure the final product is of high quality and reflects professionalism.