
In the world of video editing, you’re bound to run into situations where you need to add something at the end of a project.
Maybe it’s text that needs to appear last or a graphic that needs to be tacked onto the end of your video.
Or, maybe you want to start your video out with something happening at the beginning and then leading into your main scene.
How To Reverse A Clip In Premiere Pro
What Does It Mean To reverse a clip in premiere pro?
In a nutshell, this means to “play” the clip backwards. There are some creative uses for this effect, but the most common use is for repairs.
If you have a clip that has missing frames, for example, you can reverse it to make up for the lost seconds.
Once you’ve applied the reverse effect, your clip will play in reverse. This is easy enough to accomplish and can be done in many video editing programs, including those found within several of Adobe’s popular apps.
But there is more to reversing clips than simply playing them back in reverse order.
Ever hit a creative block and thought about flipping your footage for a fresh perspective?
Reversing a clip in Premiere Pro is a slick trick that can turn a standard shot into a captivating sequence.
We’ll guide you through the simple steps to make your video play backwards, adding an unexpected twist that’ll keep your viewers hooked.
Whether it’s for a dramatic effect or just to spice up your edit, mastering this technique will elevate your video projects.
Why Reverse A Clip In Premiere Pro?
Reversing a clip in Premiere Pro opens up a world of creative possibilities.

It’s a powerful way to evoke emotions or to create a narrative that keeps the audience guessing.
Think of iconic scenes in The Curious Case of Benjamin Button or the backwards sequences in Tenet.
These moments are unforgettable because they challenge our perception of time and storytelling.
Reversing footage can also serve a practical purpose.
Sometimes a shot works better aesthetically when the action flows in the opposite direction.
It can harmonize the motion between cuts or provide continuity that wasn’t present in the original shooting.
Here are some common scenarios where reversing a clip can be particularly effective:
- Highlighting a pivotal moment – a glass shattering in reverse can symbolize piecing together a mystery.
- Enhancing music videos – it adds an interesting dimension to dance moves or transitions.
- Illustrating flashbacks – presenting memories as if they’re being rewound gives a visual cue to the audience.
- Creating comedic effect – actions like spitting out a drink can be humorously amplified when reversed.
plus to these narrative and aesthetic applications, reversing a clip is a straightforward way to correct mistakes.
Let’s say we’ve captured a fantastic performance, but something in the background disrupts the scene.
By reversing the clip, we can often salvage the shot without reshooting.
Beyond storytelling and practical fixes, marketing and advertising campaigns frequently Use reverse clips.
It’s an effective technique to make products and messages stand out.
An item being assembled backward or a process being reversed can emphasize the product’s features or the brand’s attention to detail.
With Premiere Pro’s robust editing tools, mastering clip reversal isn’t just about correcting or enhancing.
It becomes a deliberate choice in our creative toolkit.
Exploring how we manipulate time directly impacts the tone and engagement of our audience.
Exploring The Benefits Of Reversing Footage
Reversing footage in Premiere Pro isn’t just a trick; it’s a powerful storytelling device.
It enables us to manipulate time, often resulting in a more engaging narrative.
The ability to reverse clips can turn ordinary footage into something extraordinary.
By playing with the timeline, we open up a world of creative possibilities that can transform a project.
Here are several key benefits of reversing footage:
- Emotional Impact – Reversing a scene can amplify the emotional resonance, giving audiences a fresh perspective on the narrative.
- Visual Interest – It adds an element of surprise and keeps viewers intrigued, wondering what might happen next.
- Problem Solving – We can correct errors in the footage or create continuity where it didn’t exist before.
Reversal isn’t just for effect; it often serves a practical purpose.
Footage that doesn’t quite fit can find new life when viewed in reverse.
Our applications of this technique can be subtly persuasive or blatantly artistic.

Either way, they’re a testament to our creativity and technical skills.
In iconic films like Memento, reverse chronology elevates the storytelling.
Similarly, reversing clips can help us craft our version of a non-linear narrative that captivates the audience.
From music videos to commercial ads, reversing clips can change the pace and tone.
It’s an excellent way to break away from conventional presentation styles.
How To Reverse A Clip In Premiere Pro: Step By Step Guide
Reversing a clip in Adobe Premiere Pro is a straightforward process that adds creative flair to your film.
We’ll guide you through each step to ensure you can flip your footage efficiently and effectively.
First, let’s make sure your clip is imported into your project panel.
Drag the clip onto the timeline where you plan to apply the reverse effect.
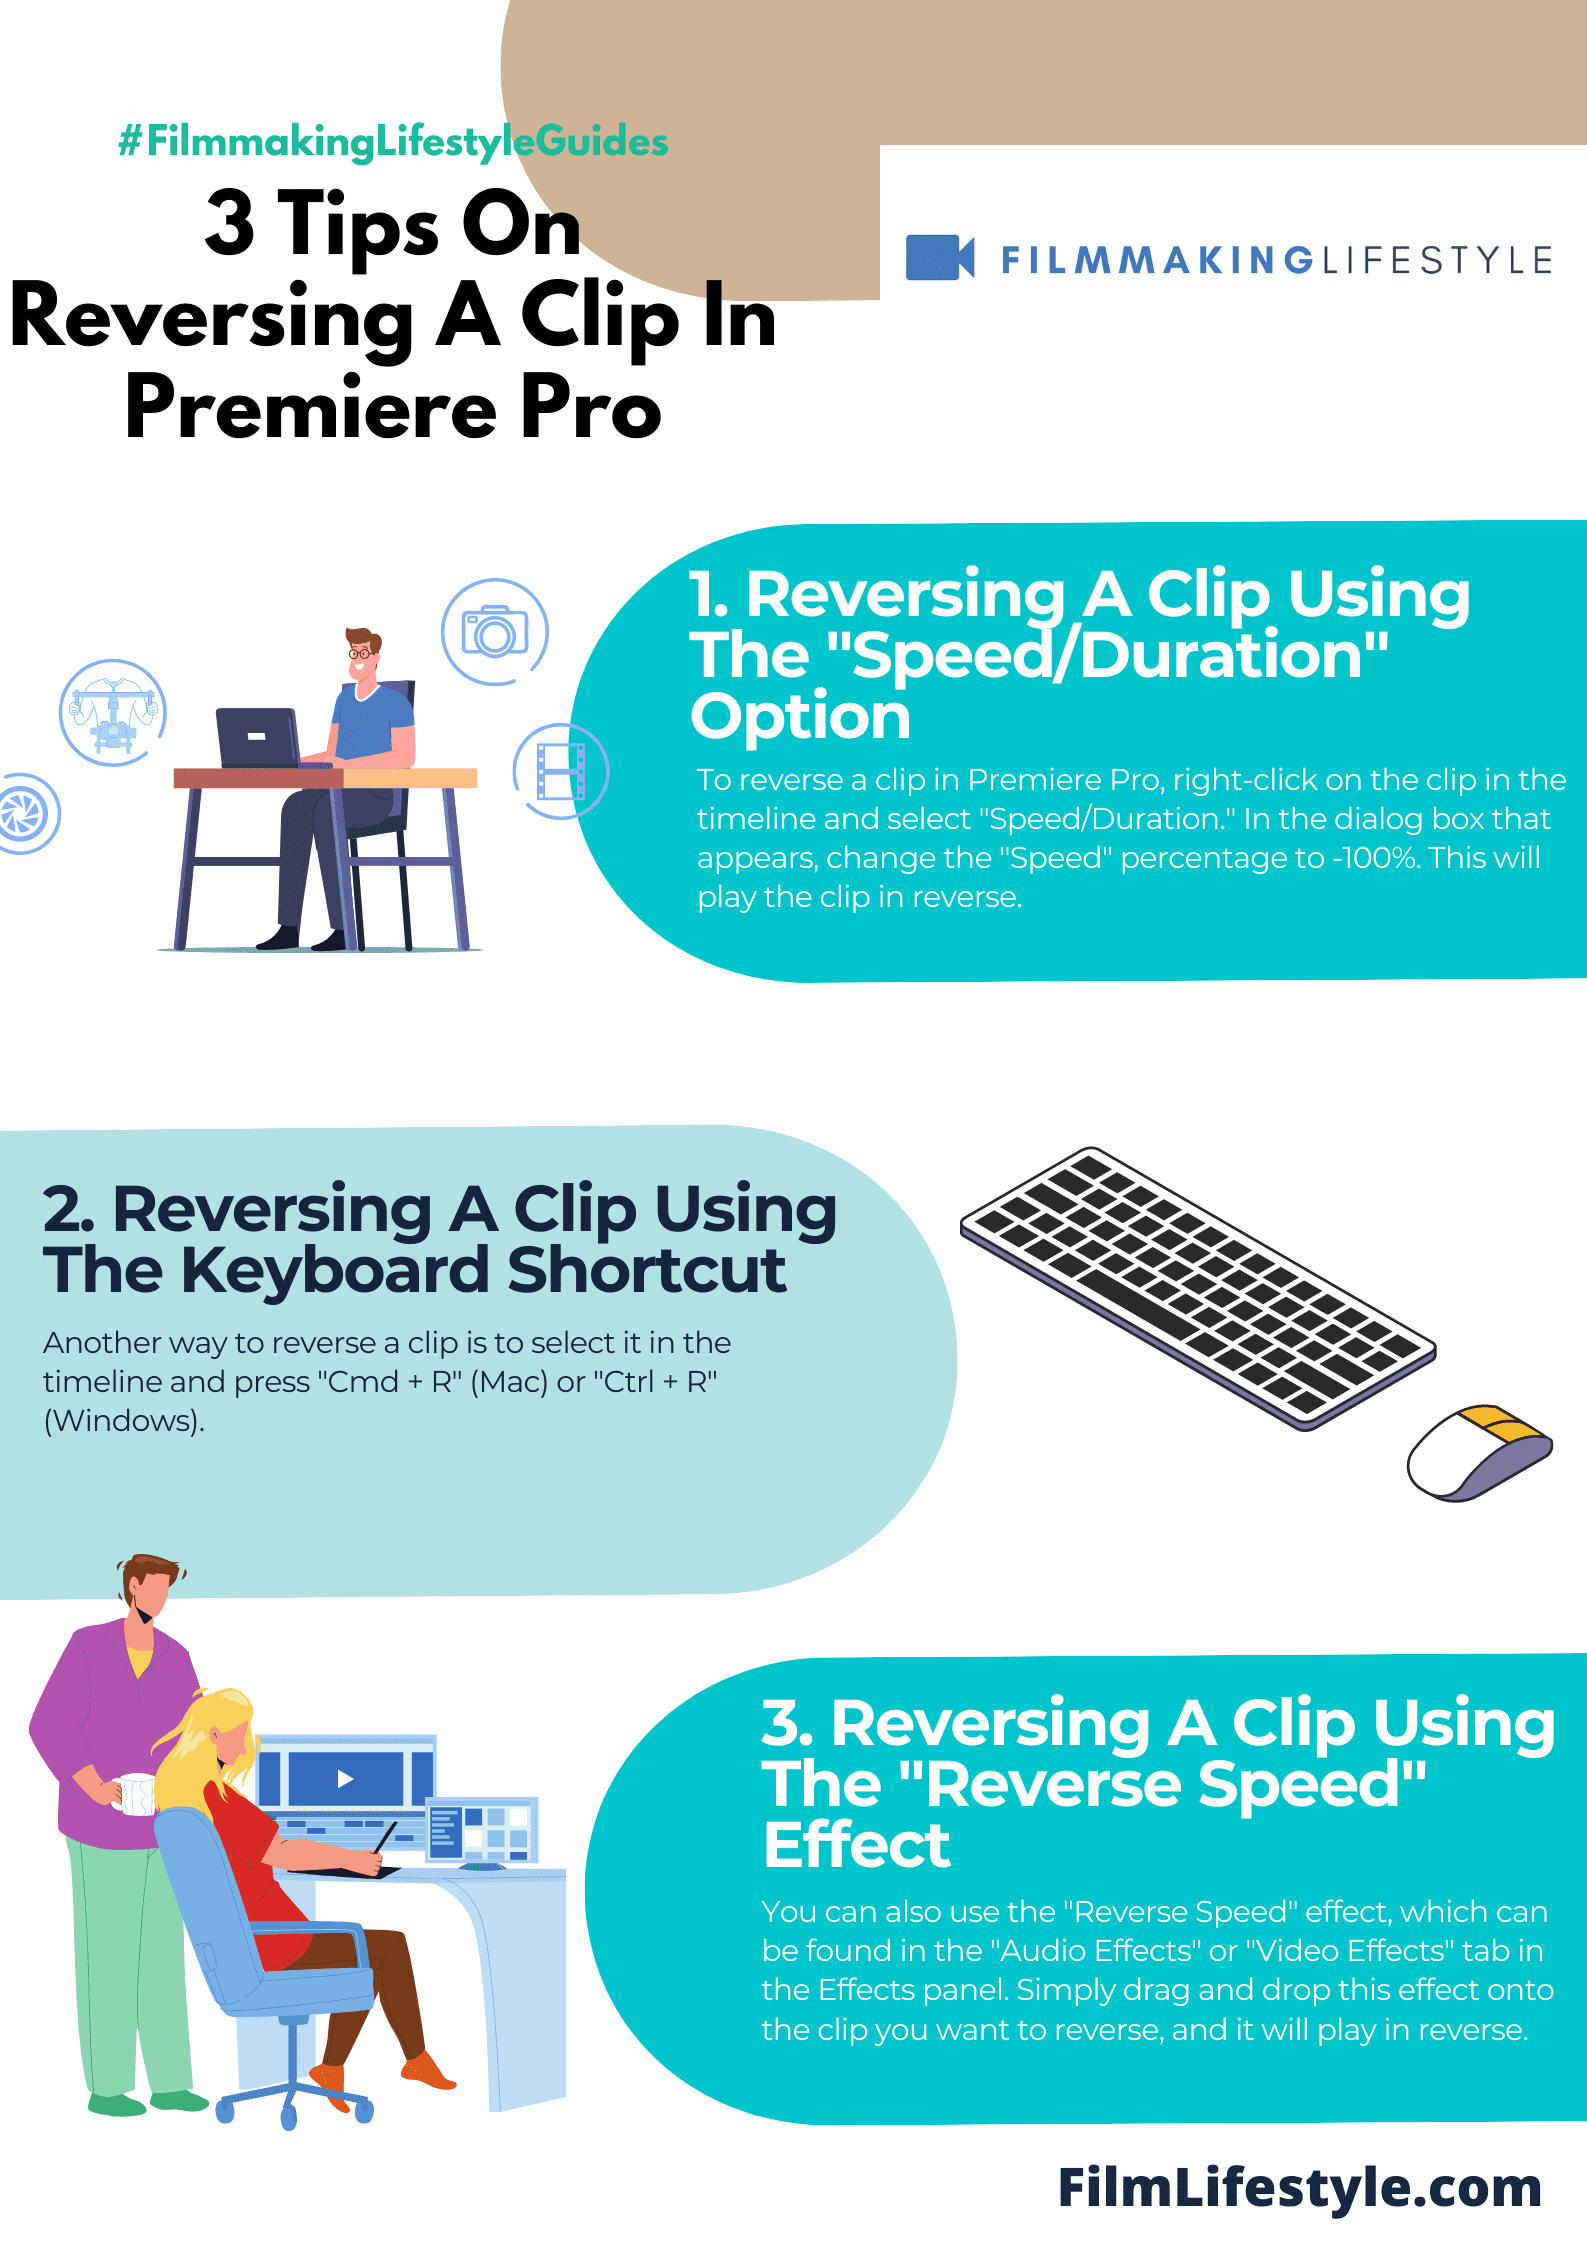
Next, right-click on the clip in the timeline.
A contextual menu will appear with a list of options.
Look for the ‘Speed/Duration’ option and select it.
In the Speed/Duration dialog box, you’ll see several settings related to the speed at which your clip is played.
To reverse the clip – simply check the box labeled ‘Reverse Speed’.
After you’ve checked ‘Reverse Speed’, hit ‘OK’.
The clip on your timeline will now play in reverse.
It’s that simple.
Remember to preview your reversed clip.
This step ensures the effect aligns with your creative vision.
Playback in Premiere Pro can be activated by pressing the spacebar or clicking the play button in the program monitor.
If the clip needs further adjustments – experiment with the speed percentage.
Slower or faster reverse playback can dramatically alter the mood and storytelling impact.
You can also consider nesting the reversed clip if you plan to add complex effects later.
Right-click the clip and select ‘Nest’.
This action groups your reversed clip as a single sequence, keeping your timeline organized and more manageable.
By following these steps, you integrate a sense of professionalism and creativity into your video project.
Practice and repeated use of the reverse function in Premiere Pro will solidify your editing skills and enhance your narrative capabilities.
Adjusting The Speed And Duration Of The Reversed Clip
Once we’ve successfully reversed a clip, tweaking its speed and duration is essential for the desired outcome.
To do this, we’ll right-click on the reversed clip in the timeline and select ‘Speed/Duration.
‘
In the Speed/Duration dialog box, we’ll find multiple options at our disposal.
By adjusting the speed percentage, we can make the clip play faster or slower.
It’s crucial to note that altering the speed affects the clip’s duration inversely – increasing speed shortens the duration, while decreasing speed lengthens it.
We’re not limited to uniform speed adjustments.
Premiere Pro allows us to create speed ramps by keyframing the speed changes.
This can add dramatic effects when transitioning in or out of scenes.
To apply speed ramps, we must:
- Right-click on the FX badge of the clip,
- Choose Time Remapping > Speed,
- Set keyframes in the timeline where we want the speed to change.
By dragging the keyframes apart, our audience is gifted with a smooth transition from one speed to another.
This technique is widely utilized in popular films to create tension or highlight a moment.
The speed also dictates the clip’s tone.
For a comedic effect, we might ramp up the speed substantially.
Conversely, for a somber or dramatic scene, slowing down the clip could emphasize specific emotions or actions.
Our mastery of these tools within Premiere Pro affords us the flexibility to explore creative avenues.
By understanding the relationship between speed, duration, and storytelling, we can significantly enhance the visual narrative of our projects.
Adding Effects To Enhance The Reversed Footage
Once we’ve mastered the basics of reversing clips in Premiere Pro, the next step is to add effects that can greatly enhance the visual appeal of our reversed footage.
Engaging our audience requires us to go beyond simply playing a clip backward.
To truly captivate viewers, we need to integrate effects that complement the reversed action and contribute to the overall storytelling.
Some effects can add a surreal quality to your reversed clips.
Consider using these within your projects:
- Time Warp: This effect can smooth out the reversed footage, making it seem as though it was intended to be played backward.
- Echo: By applying an echo effect, we create a trail on moving elements in the clip, giving it a ghostly and mesmerizing appearance.
- Glow: Adding a subtle glow can emphasize highlights and provide a dreamlike quality to your scenes.
To further push the boundaries, we can blend a variety of effects to create a unique aesthetic.
Experimenting with color manipulation, such as Invert or Tint, changes the mood and tone of the reversed footage.
Altering colors can signal a flashback in a narrative or symbolize an alternate reality.
also, layering various blend modes can result in striking visual contrasts and textures that draw the eye.
Leveraging the inherent features of Premiere Pro, we Use Adjustment Layers to apply effects non-destructively.
This way, we can tweak and refine our effects stack without altering the original clip.
As we build our sequence, it’s crucial we consider how these effects will interact with the reversed motion and serve our creative vision.
Keyframing the intensity of each effect allows us to control their impact over time.
We can start with a subtle hint of an effect and gradually ramp up or down as the scene requires.
Balance is essential – too many effects might overwhelm the footage and distract from its intended impact.
Bear in mind that some effects require more processing power and could lengthen rendering times.
To keep our workflow efficient, we should preview effects in lower resolution before final export to ensure smooth playback and timely project completion.
Tips For Using Reversed Footage Creatively
Reversed footage offers a realm of creative possibilities, spawning unique visual stories that captivate audiences.
By manipulating time, we create surreal scenarios that challenge viewers’ perceptions and expectations.
Integrating reversed clips with standard footage can create a jarring and intriguing contrast.
Take the example of Inception, where reversed explosions juxtapose with forward-moving action to enhance the dream-like quality of the scenes.
We can also layer reversed clips over each other to craft complex, textured scenes.
This technique works wonderfully to signify flashbacks or memories, offering a visual cue to the audience that we’re delving into a character’s past.
Playing with color adjustments on reversed footage can signal shifts in time or mood.
Desaturating colors might imply a return to a more distant memory, while oversaturating could depict intense, emotional recollections.
Storyboarding the integration of reversed clips ensures that the narrative flow isn’t disrupted.
Here are a few pointers we can follow to keep our storyline cohesive:
- Plan which scenes will benefit from reversed footage – Determine the emotional impact we want to evoke,
- Ensure transitional elements are clear and assist in forward narrative progression.
Sound design plays a crucial role when reversing clips.
We often find that reversing the audio attached to the clip doesn’t yield the desired effect.
Instead, we can explore:
- Adding ambient sounds that complement the reversal,
- Using musical cues to smooth the transition between reversed and regular footage,
- Recording foley sounds that act as auditory signifiers of reversed actions.
Utilizing reversed footage isn’t just about the visual element; it’s also about creating a cohesive sensory experience.
By considering both sound and visual aesthetics, we provide a richer, more immersive experience for our viewers.
We leverage these techniques not as gimmicks but as integral storytelling tools that contribute substantially to the art of filmmaking.
How To Reverse A Clip In Premiere Pro – Wrap Up
We’ve walked through the essentials of reversing clips in Premiere Pro, from the initial steps to the application of dynamic effects.
Remember, the key to mastering this technique lies in the details—adjusting speed and duration, creating speed ramps, and enhancing visuals with effects.
By integrating reversed footage with standard clips and paying close attention to color and sound design, we can craft a truly immersive experience for our audience.
Let’s put these skills into practice and watch our storytelling take an exciting turn.
Don’t forget to storyboard and preview in lower resolutions to ensure a smooth creative process.
Now it’s time to explore the creative possibilities that await in our next video project!
Frequently Asked Questions
How Do You Reverse A Clip In Adobe Premiere Pro?
To reverse a clip in Adobe Premiere Pro, import your clip into the timeline, right-click on it, select ‘Speed/Duration,’ then check the ‘Reverse Speed’ option.
Click ‘OK’ to apply the reverse effect.
Can You Adjust The Speed Of A Reversed Clip In Premiere Pro?
Yes, you can adjust the speed of a reversed clip in Premiere Pro.
During the ‘Speed/Duration’ settings, you can set a new speed percentage to make the reversed clip play faster or slower.
What Is A Speed Ramp In Video Editing?
A speed ramp in video editing is a technique where the speed of the clip gradually changes over time.
You can create speed ramps in Premiere Pro by keyframing the speed changes on the timeline.
Why Is Adjusting Speed And Duration Important In Reversed Clips?
Adjusting speed and duration is important in reversed clips to achieve the desired effect and ensure the reversed footage matches the tempo and narrative of the overall project.
How Can You Enhance Reversed Footage In Premiere Pro?
You can enhance reversed footage in Premiere Pro by adding effects such as Time Warp, Echo, or Glow.
Additionally, blending effects, color manipulation, and using layering blend modes can create unique aesthetics.
What Is The Purpose Of Using Adjustment Layers For Effects?
Using adjustment layers for effects allows you to apply changes non-destructively to multiple clips or the entire sequence, providing flexibility to adjust the intensity or presence of the effects without altering original footage.
Why Should You Consider Processing Power And Rendering Times When Using Effects?
Considering processing power and rendering times is crucial because effects can be processing-intensive.
It’s advisable to preview effects in lower resolution for a smoother editing experience and to minimize rendering times during export.
How Can Reversed Footage Be Used Creatively In A Film?
Reversed footage can be integrated with standard footage, layered for complex visuals, played with in terms of color adjustments, and paired with sound design to enhance storytelling and create a cohesive sensory experience for viewers.