Today, we have an article by Emre Kutay, filmmaker and editor who specializes in creating LUTs. This article is going to cover all aspects of LUT creation to improve your editing.
Emre is brilliant as LUT color grading and he’ll take you through all the steps required to master LUT video, using examples from his own work.
If you’re unsure what a LUT is, it isn’t some kind of infection, or the acronym of a secret government agency.
LUTs have been around for a long time, in one form or another. LUT stands for ‘lookup table,’ and in filmmaking terms they’re sometimes referred to as 3D LUTs.
LUTs are used to map one color space to another and use a table of numbers to transform an image.
In video editing terms, this means we can create all kinds of LUTs to help us with color grading video. They also help greatly with achieving a more cinematic look.
Thus, LUT color grading in non-linear editing systems like FCP, Premiere Pro and
Take it away, Emre!
LUT Color Grading – The Lowdown
Hey Creatives, my name is Emre Kutay and my biggest passion is filmmaking!
I love everything about filmmaking, but color grading catches most of my attention because it means for me the final touch to create a cinematic film look.
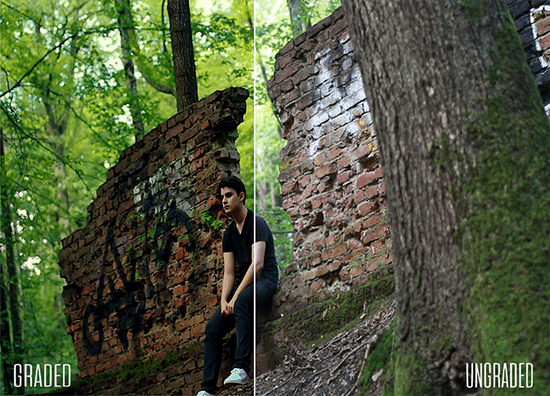
Color grading changes the whole atmosphere of a movie. To show that here are frames from an identical movie color graded in two different ways.
Graded With My Action LUT:
Graded With My Vibrant LUT:
The first image looks like a frame from an action movie and on the other hand the second image looks much more like a frame of a comedy or romantic movie.
Although they are frames from the identical movie, the different color grading makes you think about non-identical genres and atmospheres. Therefore, color grading is magical and impacts the whole movie.
The Color Grading Journey
After realizing the importance of color grading I started researching how I can use this and make my movies / videos look much more cinematic and professional. I experimented a lot to learn the process of color grading.
I wanted to have a unique style of color grading and I also wanted the short movies that I shoot to differ from others.
In addition, cinematic color grading makes your (short) movies and videos much more professional without forcing you to spend tons of money!
If you are interested in filmmaking, you probably already have an editing software installed on your computer like Adobe Premiere Pro, Adobe
If you learn how to color grade and use color grading LUTs you can increase the quality of your movies a lot by using the editing software you already have installed on your computer without spending a fortune.
Since the realization of the importance of this I spent two years focusing on color grading. I tried plenty of looks out and started to sell the best looks that I have achieved. Currently, I am selling my best 16 LUTs, and as I create new ones the number of LUTs increase.
So What Exactly Is A LUT?
If you ask yourself what a (Look Up Table) LUT is? If you want to explain it in the easiest form, it’s like an Instagram filter for your videos. You select the LUT and get a certain ‘look’ that is unique to the LUT.
I sell only the best looks out of hundreds because I want to provide my customers the highest quality that is possible. To be sure that the LUTs give the best look in any situation, I try them out with plenty of different footage and sell the best ones.
I am currently working on my own website where I will sell them in the future. Also, Matt at Filmmaking Lifestyle has allowed me to put together a awesome bonus, so here’s a special 20% discount code just for Filmmaking Lifestyle readers! (Discount Code: Filmmakinglifestyle20)
My Nature LUT:
Now I want to talk about my process of creating my LUTs and the process of color grading.
To be able to color grade better, easier and to get better results with LUTs, there are some steps that you have to do in the shooting process.
1. Shooting In A Flat Picture Profile
What does this mean? If you use a flat picture profile the footage you get is not too saturated and contrasty therefore it looks flat.
When you use a flat picture profile, it is much easier to give color to your footage in post-production and it looks much better as well.
How can you shoot in a flat picture profile? This depends on the camera you use. For example, if you use a Canon DSLR, you can install Technicolor Cinestyle Picture Profile to your camera. If you use a Sony or Panasonic Camera, there are already pre-installed flat picture profiles on the camera.

Important Tip: If you do not have an installed flat picture profile on your camera, or you have already shot the movie that you want to color grade, I have a special LUT that converts normal footage to flat footage and so you can also use another LUT over that to get the final look. This Flat LUT is included in my Cinema LUTs Pack.
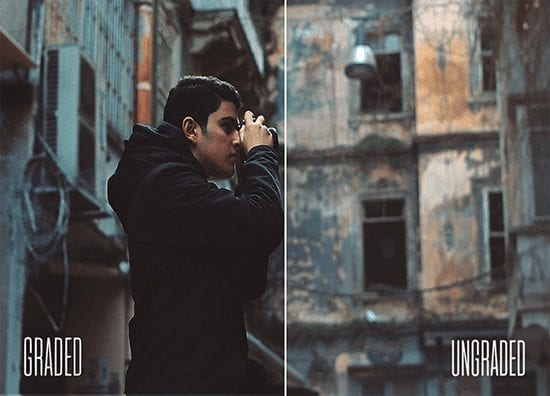
Normal Footage:
Graded With My Flat LUT:
2. Adjusting The White Balance Before Shooting
This is a mistake that many filmmakers do. To get the best result, it’s important to adjust the white balance before shooting your movie. For example, if you want to get a colder look, you have to decrease the kelvin number and increase it if you want to get a warmer look manually on your camera before you start shooting.
After you have shot your movie or video in a flat picture profile, and you have manually adjusted the white balance, you can start color grading.
The color grading process can be done in editing softwares like Adobe Premiere Pro, Adobe
3. The Tricky Aspects Of LUT Color Grading
For most filmmakers, the easiest and most practical way to color grade your movie/video is to use color grading LUTs. The reason for that is that the process of creating a look is not that easy! It is not really complex, but a frustrating thing is that a specific look that you have created won’t look the same way on every piece of footage.
Every piece of footage looks different because the lighting situation, the time of day, the location, etc. changes all the time. Therefore, a look that look amazing on a specific footage can look not that good on another footage.
To sum up, if you do not have knowledge about color grading and want your footage to look much more cinematic without much effort in a practical way just use LUTs. But if you have some knowledge about color grading and you want to improve yourself, I would encourage you to experiment with color grading as much as possible.
Developing Custom Luts For Clients
One of the things that I also do is create custom LUTs for my client’s movies / videos. My customer answers a few questions that I ask and sends me several clips and pictures from his / her movie and I create a special look just for the movie due to their requests.
If you want me to create a special look just for your movie as well, you can contact me through email.
Once you get good at creating LUTs, you can also do this for clients.
Creating A LUT
If I want to create a new LUT (look), in general I ask the same questions to myself as if I was creating a LUT for a client:
- What is the type (genre) of the movie / video project.
- What is the mood of the movie or video.
- Are there any colors or tones that I want to highlight.
- What kind of a look / atmosphere do I want (dreamy, faded, clear, contrasty, etc.)
I analyze the footage of the movie I have shot and find the answers to this question. To edit and color grade I use the Lumetri Color Panel in Adobe Premiere Pro.
If the genre of the movie is action or drama, and the mood is emotional or dramatic, I like to highlight the colors green, blue and its tones.
My Action LUT:
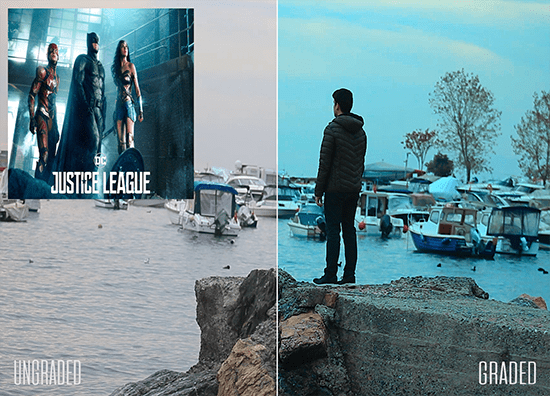
The reason for this is that the audience associates green and blue colors with action and drama movies. There are plenty of examples for this.
Here you can see an image from the movie Matrix as an example:
In my product line there is a Film Looks LUT Pack. These pack includes inspired LUTs (Film Looks) from these recent popular movies:
– The Christopher Nolan directed and written movie Dunkirk.
– The movie IT that is based on the 1986 novel by Stephen King.
– The latest DC movie Justice League.
– The movie Shape Of Water that has 13 Oscar Nominations.
You get the similar film looks of these movies by using the Film Looks LUTs pack.
For example, you can get the same dramatic look of the Christopher Nolan directed and written movie Dunkirk by using the Dunkirk Inspired LUT from the pack.
If I want to color grade a romantic or comedy movie, I use the colors yellow, orange and its tones:
My Vibrant LUT:
If I have a special look or atmosphere in my head like dreamy, faded, clear, contrasty, etc, I experiment with the colors to get such a look.
Example Images From My Unique Vintage LUTs:
Example Images From My Artistic LUTs:
Example Images From My Cinema LUTs:
When I color grade horror and thriller movies I like to create a dark atmosphere. Therefore, I usually highlight the grey tones.
Example Image From My IT Inspired LUT:
Another important thing in color grading is the suitableness of the LUTs in as many footage types as possible.
Like I said, it can happen that a look that looks amazing on a specific footage can look out of place on another footage. To avoid this, I test the LUTs on plenty of footage types and continuously make minor adjustments. The LUTs that look cinematic in the most cases pass the test to be sold as a product of mine.
LUT Color Grading – Conclusion
In conclusion, color grading is the final touch to get a cinematic look and adds a lot of value to your movies. Also, it helps your editing workflow and makes your grading more efficient if you use LUTs that have good quality. Therefore, I encourage you all to pay attention to LUTs, and maybe even create some of your own.
Keep Shooting,
Emre Kutay
Matt Crawford
Related posts
80 Comments
Leave a Reply Cancel reply
This site uses Akismet to reduce spam. Learn how your comment data is processed.


LUTs seem to be all the rage. Thanks for this post was useful
For sure! Thanks for the comment, jeannie!
amazing work..
Cheers, Clint!
LUTs seem awesome. Really great article, Glad to read the article. It is very informative for us. Thanks for posting
Thanks for the comment.
Awesome info love it!
Thanks, Derek!
Hard Work is very good, Very Well Explained.
Thanks!
Very Informative.
Thanks for the comment, Saahil!
thanks for your valuable information, i love your content. Thank you for sharing the information.
Thanks, Suraj.
Great article right to the point.
Thanks for sharing and keep up the good work. guys
Thanks a lot, Thomas – appreciated.
very helpful content keeps posting these types of content
Thanks for the comment, suraj.
Thank you so much for your Great article. Actually I am not so good in photography or creating video content. your article will help me a lot.
Thanks, Rabeya. Glad it’s been helpful for you!
Great Content!
thanks for sharing this valuable content with us. thanks for sharing this valuable content with us. I am waiting for this for a long time.
Excellent! Thanks for the help
No probs, Gideon!
Amazing. Loved the way you have provided a detailed explanation
Absolutely, Atika!
I am always searching online for articles that can help me. There is obviously a lot to know about this. I think you made some good points in Features also. Keep working, great job
Spot on. Thanks for the comment, Patrick!
Thank you so much I always learn something new from these
Thanks for the comment, Carrie.
I think I now know everything about creating luts
Glad you liked the article, ans.
Thanks for sharing the info
No probs, Waseem. Thanks for the comment!
I think I now know everything about creating luts
Appreciate it, Val!
Thanks for information
No probs!
one of the best informative blog ever .bookmarked for the future read
thank you for providing a lot of information
Thanks, appreciate it!
I wish more writers of this sort of substance would take the time you did to explore and compose so well. I am exceptionally awed with your vision and knowledge.
Thanks, Mark – appreciate it.
Awesome stuff!
Thanks, Vikram.
Good Post!
Thanks!
Nice work
Appreciate it.
Nice post
Thanks!
wow superr!!
Thanks, Rhishikesh.
Really great information can be found on this website
Thanks, Virgo!
Appreciate you sharing, great article post.Much thanks again. Want more.
Thanks, manhwaland!
Nice & interesting article.
Thanks!
Very nice post. I just came upon your blog I’m very pleased to read this article and wanted to say that I have really enjoyed browsing your blog posts!
Appreciate it, Sonia.
Nice and very informative post. Your opinion is more or less the same as mine. Thanks!
Thanks, Sahil.
LUTs are rad!
Great items from you, man. I have remember your stuff previous
to and you are simply extremely wonderful. I really like what you have laid out here, really like what you are saying and the way in which
you assert it. You’re making it enjoyable and you
still take care of to keep it sensible. I can’t wait to read far more from you.
This is actually a tremendous site.
LUTs are, indeed, rad! Thanks, Josie!
What a tremendous post. LUTs are more complex than they seem. This broke it down well!!
Thanks, Raaj! They are indeed.
Really enjoyed reading this!
Thanks, James!
Love this stuff on LUTs!
Very helpful as a video editor.
Glad to be of help, Jaye.
Nice post! Needed a guide on LUT color grading and this has delivered.
Thanks, Tina.
Thanks for this amazing post on LUT color grading, I think it was really helpful. Keep up the great work.
Thanks, Minakshi.
Great work. Thank for sharing the information.
Thanks for the comment!
Content is very useful and helpful thanks for the great information on LUT color grading.
Thanks, Rizwan.
thank you for the useful information
Thanks! I appreciate you taking the time to engage.