The following guide is a guest article by Will Ellis of Meadow Farm Studios. It’s a great guide to the different types of video production lighting and the options you have with your lighting. Enjoy!
Many photographers will insist that lighting is the focal point of photography. Filmmakers may tend to agree, especially since there’s nothing more pleasing to the eye than a perfectly fleshed out scene.
No matter how good you are at conceiving a story, filming it and then producing it, if you don’t know anything about lighting, you’re doing yourself a disservice. After all, sight is one of our great assets, and human eyes are nothing more than organic lenses. Like all lenses, our eyes focus the light available so that it can be translated into an image by the brain (and its amazing software).
This is where lighting comes into play. And there is no way to exaggerate its importance, as any professional video production company knows. Any light kit, even an inexpensive one or a DIY one, will make a world of difference as opposed to having no kit at all, and not being able to use your extra lights to control the scene as necessary.
If you’re already accustomed to these, feel free to skip ahead, to some applied knowledge on the main types of lighting methods in use today. We illustrate three-point and four-point lighting, as well as the McCandless approach. Finally, we offer some pointers on how to choose your equipment, based on its main features and the basic types on the market.
That being said, we hope you’ll enjoy and come out at the other end ready to shoot your masterpiece!
From Theory To Practise
Key Concept 1: Black Body
A black body is conceived as a delineated part of matter that is opaque, non-reflective and capable of absorbing electromagnetic radiation sent its way while ultimately emitting radiation of its own.
A perfect blackbody is an imagined, ideal one that can absorb all incoming light without reflecting any of it. In simpler terms, as the black body heats up it starts glowing, thereby emitting visible light of its own. The hotter it gets, the more its light spectrum varies.
Key Concept 2: Incandescent Radiators
Incandescent radiators are real-life objects that behave like a black body (though not like a perfect one), meaning that they emit light of various colours in the visible spectrum as they heat up.
Examples: A candle, a household light-bulb, the sun.
The colour of the light they give can vary from deep red to red, to orange, to yellow and ultimately to white (the Latin verb “incandescere” means “to glow white“).
Key Concept 3: Colour Temperature (CT)
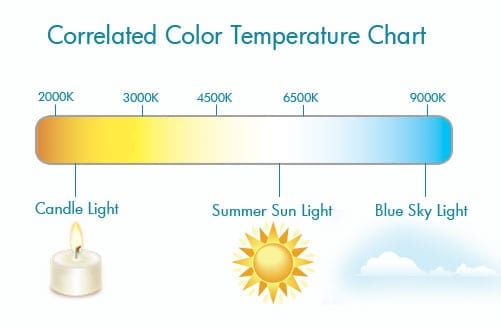
The “layman” definition is that colour temperature is a value, in Kelvin degrees, given to colours of light in order to help in describing them as warm or cool. To be more precise, this colour temperature is in fact the temperature, in Kelvin, at which an incandescent radiator needs to be heated to emit light of a certain colour in the visible spectrum.

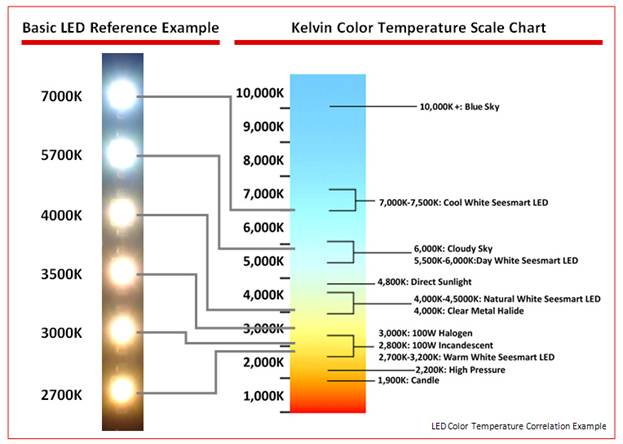
IMPORTANT! Take note that, rather counter intuitively, what we call warm colours have a lower temperature, while cool colours have a higher temperature in the Colour Temperature Scale! So, the warm orange candle light above has a colour temperature of 1500 – 1850 °K, but the cool bluish light emitted by a monitor has a 6500 – 9500 °K colour temperature.
IMPORTANT! Colour temperatures that you might find for a given incandescent light source may vary considerably. There are some standard values, but they are just that: standards agreed upon as being characteristic for a given light source.
IMPORTANT! If an incandescent radiator allows you the option to gradually dim it, as you dim this light source and it cools, the colour will get warmer.
IMPORTANT! Apart from light whose spectrum is visible to the human eye, there is also light that shines at lower levels than the eye can see, called infrared. Light that shines at levels higher than the eye can see is called ultraviolet.
See the chart below for Colour Temperature values attributed to the most common types of light sources.
Key Concept 4: Correlated Colour Temperature (CCT)
Not all incandescent light sources available for video lighting today are radiators. Since the light some give is the result of other processes (such as electrical current stimulating low pressure gasses, etc.), they cannot be attributed a temperature, as is the case with incandescent radiators.
So, instead, they are given what is called a Correlated Colour Temperature (CCT). This is visually based and has nothing to do with the actual temperature of the physical object emitting the light because, as mentioned, they don’t heat up and glow like iridescent radiators.
Examples: The CCT of plain fluorescent bulbs, such as those used in households, ranges between 4,300 and 4,700 °K.
Fluorescent bulbs used for photo and video work can range between 3,000 and 3,200 °K (for those that emulate tungsten-halogen light-bulbs) and 5,000 – 5,600 °K (for those that emulate daylight).
Similar to camera flashes, which range between 5,000 and 6,000 °K, LEDs score in the 3,000 – 6,000 °K range and HMI lamps (Hydrargyrum Medium-arc Iodide lamps) stand at 6,000 °K.
Key Concept 5: Colour Rendering Index (CRI)
Incandescent radiators emit light at all wavelengths of the spectrum (they are also explained as having a continuous spectrum). This, in effect, means they treat all the colours that they light up equally.
Correlated Colour Temperature light sources do not have a continuous spectrum. In other words, they can render a higher level for one colour and/or a lower one for another in the same scene.
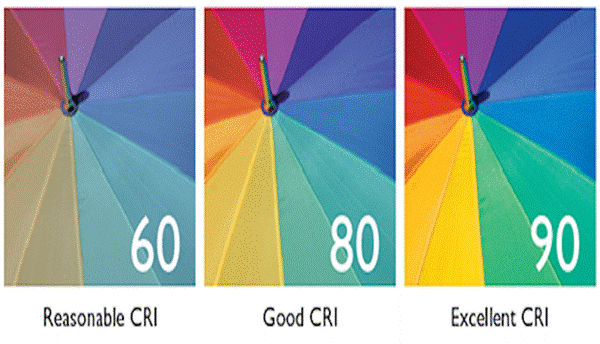
The Colour Rendering Index measures the ability of a light source to radiate light in all the colours of its spectrum equally, like iridescent radiators do.
Since we’re on this topic, it’s interesting to note that iridescent radiators have a CRI of 100. This is the maximum, as the scale runs from 1 to 100.
Other CRI ratings:
– Household fluorescent light-bulbs have a CRI somewhere around 80 (or lower).
– Photo and video quality fluorescent lamps have a CRI of around 90 or higher.
– The CRI for HMIs is generally around 95 or above.
– And LEDs would have a CRI between 70 and 90.
If you’re interested, you can find more CRI listings on the net, to compare. This might be particularly useful to do, for example, for the different values provided by manufacturers, before you buy equipment.
IMPORTANT! For now, suffice to say that a CRI of 90 or above is considered decent by most experienced video and photo pros—one that you can work with, even on high-end production jobs.
This holds true as well when you compate two different cameras with the same CRI, if it’s lower than 100. The xcameras might, and probably will, render seperate colours differently even between themselves! And despite the existence of video editinig, even colorisation experts might find it difficult (if not impossible) to correct the colours post-shooting.
IMPORTANT! The proper scientific name for CRI is CIE Ra,. This is the international standard colour rendering ndex. CIE stands for the “International Commission on Illumination” (from the French “Commission International de l’Eclairage”), founded in 1913.
They even completed and released a second version of the index, called R96a, in order to address some of the criticism faced by the original index.
R96a was never widely adopted by those in the field, so, when referring to CRI, you are expected to use the original Ra,. If R96a is used instead, this should be explicitly mentioned by the manufacturer. But remember to ask, if you want to be sure.
IMPORTANT! Another index was proposed, also to address the criticisms faced by the Ra, and this index is called the Gamut Area Index (GAI). Proponents consider it a complementary index. This one is meant to be used alongside the CRI when describing a lamp’s capabilities, not to replace it entirely. The ideal lamp will score highly on both indexes.
Key Concept 6: White Balancing
Through their sensors, cameras also have a range at which they perceive the world and render the colours in it. And, according to the settings you choose, this perception of colours can vary drastically.
When setting the camera up for a shoot, the operator must pick a neutral colour point of reference and “teach” the camera what kind of colour that is. Most commonly, white is used as reference. So, quite simply, this translates to choosing your reference for white, at a given location, within the light conditions present.
Example: Say you see a white wall in an otherwise coloured urban landscape. You focus the camera on that and use the camera’s white balance function to have it adjust all the other colours according to this definition of white. Once you chose what white is, the camera will globally adjust the intensity of all the other colours to match.
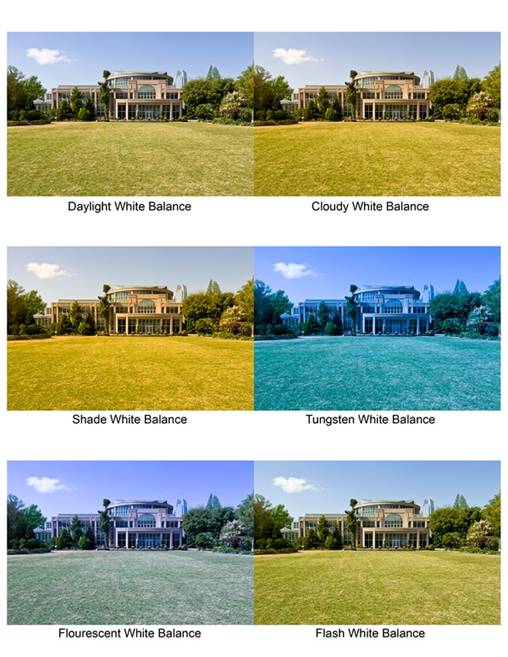
IMPORTANT! Aside from letting you select the white balance yourself, most cameras come with presets for various lighting situations, based on increasing the colour temperature. They are: Tungsten, Fluorescent, Daylight, Flash, Cloudy and Shade.
IMPORTANT! There is also an Auto White Balance setting, in which the camera will attempt to use an algorithm to try and balance itself, to a range of about 3,000 to 7,000 °K. However, depending on the colours of the scene and the light sources, using this can very easily result in an unbalanced setting.
Example: If there a scene contains many elements in warm colours (like red) and also a considerable amount of elements in cool colours (blue), but fewer than the former, placed beneath them, or mixed up in some way, the camera might try to compensate for the ones it sees as dominant (those closer to the forefront or greater in number; in this case, the reds) by toning down those colours and consequently accentuating the others (in this case, the blues).
If the colour temperatures of the light sources vary, this will also confuse the camera and result in errors with its Auto-White Balance feature (AWB). So it’s best to not use it and instead white-balance the shoot yourself. It would be preferable to make all the lighting in a set-up the same Colour Temperature!
Instead of selecting a neutral colour reference in the scene, which has a very high chance of being mixed with undertones of other colours (so not a true neutral colour), or might not exist in the scene at all, you can buy custom and pre-made neutral colour references (like small grey, white, black cards) designed especially for photo and video work.
This way, you will always know you’re using a true white or other neutral colour reference with you. All you have to do is take it out of the bag, place it in the scene and focus the camera on it.
An Interview (3-Point Lighting Tutorial)” width=”500″ height=”281″ src=”https://www.youtube.com/embed/MLlMl2KuZi0?feature=oembed” frameborder=”0″ allow=”accelerometer; autoplay; clipboard-write; encrypted-media; gyroscope; picture-in-picture; web-share” allowfullscreen>
Video Production Lighting Methods
Three Point Lighting
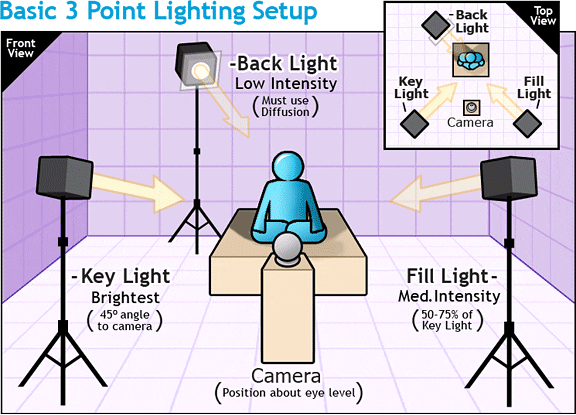
The most widely used method and the one recommended for “young” video production companies to use as a start is the three-point lighting method. It doesn’t mean that you shouldn’t experiment with other setups as you get more experienced (on the contrary, that is recommended), but for starters, use this one, which has been successfully applied for many decades, in anything from theatre, film, photography to CGI. It consists of three light sources:
I) the key light,
II) the fill light
III) the back light.
The Key Light
As the name says, this is the main source. It should be the strongest of the three lights (in lumens, watts, or foot-candles, which will all be discussed later).
It should be positioned to the side of the axis created by the camera and the subject. Its distance from the camera and subject may vary depending on the light source’s power, but a rule of thumb is to put it in line with the camera and adjust by moving it back and forth from there.
The angle drawn by:
a) the line extending from the light source to the subject, and
b) the line extending from the camera to the subject should be somewhere between 15 to 45 degrees. The most common recommendation is 45 degrees.
In terms of height, key light recommendations will have it positioned slightly higher than the subject, shining down on it, at about 30 – 45 degrees from the ground. But, again, this is not set in stone.
The purpose of the key light is to illuminate the subject from a side, bringing him/her/it to focus, while still creating shadows, contrast and dynamism, plus a sense of depth. That’s why the key light should not be aligned with the camera, facing the subject head-on, as that would make it look flat.
The Fill Light
Its function is to help manage the excessive shadows created by the key light and help you avoid creating a skewed, imbalanced shot with regards to these shadows and lighting.
However, its purpose is not to erase these shadows completely! It just aims to make them more subtle and less blaring. In fact, depending on the production, if a powerful contrast and shadows are desired for an extreme effect (like underlining stress or tension), the fill light can be discarded completely.
If used, the fill light should rest to the other side of the key light (so, to the left if key light is on the right and vice-versa). Its distance from the subject depends from case to case and should be adjusted as in the case of the key light: start in line with the camera and move closer and further to the subject from there.
The recommended angle of the fill light (like the one of the key light) is 45 degrees, but you can experiment to see what works best.
If you need a more diffuse fill light, filters (to be discussed later) can be attached to the lamp to achieve this effect.
The strength of the fill light should be considerably lower than that of the key light. The recommendation is to have the fill light set to half the intensity of the key light. But, as with anything else, you can experiment beyond this rule of thumb–as long as the fill light doesn’t compete with the key light, hinder or cancel it!
The height at which the fill light should be about face/top level with the subject.
The Backlight
The shoulder/rim light, as it is alternatively called, should be positioned behind the subject, either to the side, at a 45 degree angle relative to the axis that the camera and subject lie on, or directly behind it.
Its height, like that of the key light, should be above the subject, shining down on it. The recommended distance is as close to the scene as possible, without hindering the shot (i.e., appearing in it).
The function of the back light is to separate the subject from the background, to create an outline or contour of the subject and a halo around it. Where the strength of the backlight is concerned, it should clearly not compete with the key light.
Opinions vary when it comes to the back and fill lights. Some say that they should be of equal strength, others insist that the fill light should be weaker than the back light, while others insist it should be the other way around. Experiment and decide for yourself.
IMPORTANT! If you’re not shooting at night or indoors, in a building which completely blocks out natural light, you will have to discount for daylight. Most experts recommend not competing with it by adding three extra lights (as mentioned above). Instead, try to set up the shot so that daylight works as a fill or backlight, or even as the key light if you’re getting enough!
Three Point Lighting
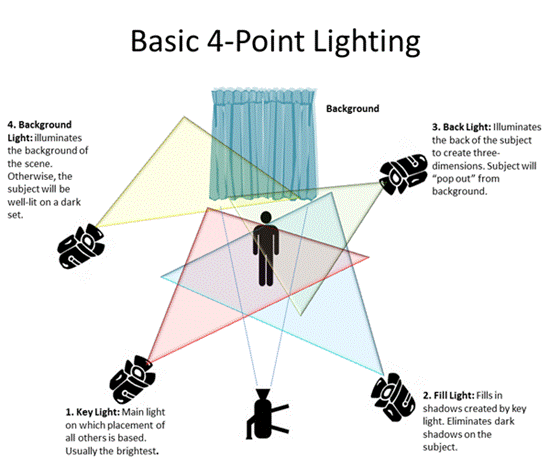
It should be placed to the side of the subject (again, a 45 degree angle to the camera-subject axis is a good place to start), so that it doesn’t enter the shot. It could also be placed directly behind it as well, because the height of this background light should either be pretty high (higher than the key and back-lights) or near ground level/on the ground.
The strength of this light depends on the particular situation and background, because its function is to add even more depth to the scene, erase whatever ugly shadows might be cast on the background by the subject and props (which would might be visible in the scene) or simply to point the viewer’s attention to the background if it contains elements important to the shoot/story.
IMPORTANT! Another variation is to use just the background light, the key light, and the fill, with the latter two both being placed higher than the subject and shining down. Tinker with the distances, strength, etc.
The Mccandless Method
It is named after Stanley McCandless, an American widely thought of as the father of lighting design.
This method is used by many production companies, particularly on stage, to light actors in such a way that their features are strongly emphasized and they are also fully lit from the front, in order to augment the effect their acting and facial expressions have on audiences.
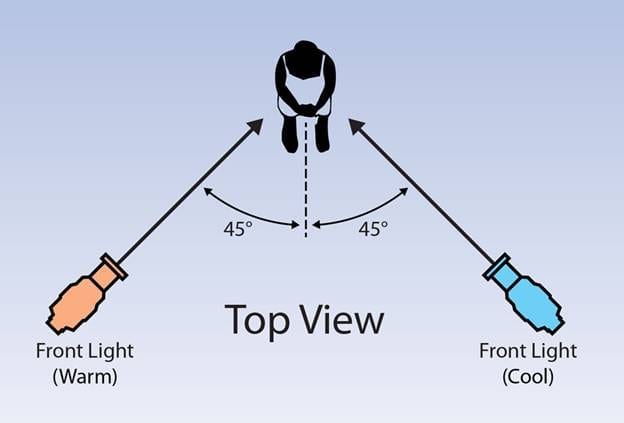
But the really “audacious” thing is that McCandless decided to use two different colours for the main two lights: a warm one and a cool one.
They are balanced out in such a way as to give the feel of natural sunrise, while exaggerating the actors’ features in the same time.
A difficult trick indeed. Depending on the video production services required of you, you might want to learn more about this method and use it for yourself.
Equipment Selection
Let’s start by making it clear that no guide can tell you what the “best” equipment is. As is the case in any complex field, video production lighting is affected by a set of many variables, as well as by your own creative input. The artist/producer has to decide what equipment is suitable for his or her own needs. Budget constraints are equally important here.
Besides, a lot of contemporary technology is sufficiently capable to produce a decent result, even at the lower end of the pricing range. This especially if the owner takes time to discover its strengths, weaknesses, and limitations.
With this disclaimer in mind, in the following, we present a general overview of existing equipment. We offer a couple of specific tips here and there, but no “definitive” list on specific brands and price ranges. Check out specialized forum boards and Amazon for this kind of info on any product type.
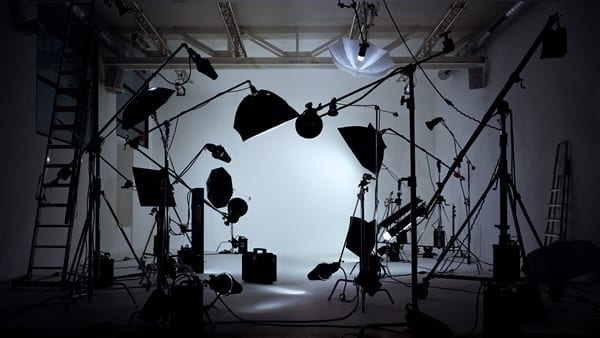
Traits Of Lighting Equipment
Light sources used for lighting in movie productions are called (light) fixtures in the US, and luminaires (originally from French), or fittings in the UK. The main structure of all fixtures comprises a body with a socket, and a lamp or light bulb, which fits into that socket. The body (back) of a fixture can be hard or soft depending on the design and the materials involved.
Fixtures are electrical and require power to function. Some have permanent access via power wiring, while others can be plugged in or out. Like normal light bulbs, most fixtures allow the lamp to be replaced. Most of them come with an on/off switch.
Control Of Light Direction
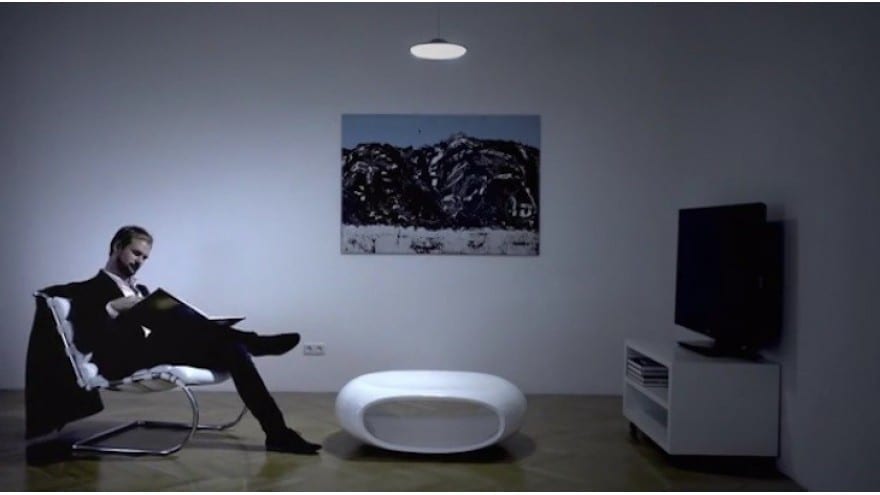
In terms of how the light spreads from a source, fixtures can be classed as spotlights and floodlights.
– Spotlights allow control over the direction of the light via a beam of light, which can be focused on the subject, or part of the subject.
– Floodlights cannot be controlled and just “flood” the scene in a given direction.
Types Of Lamps
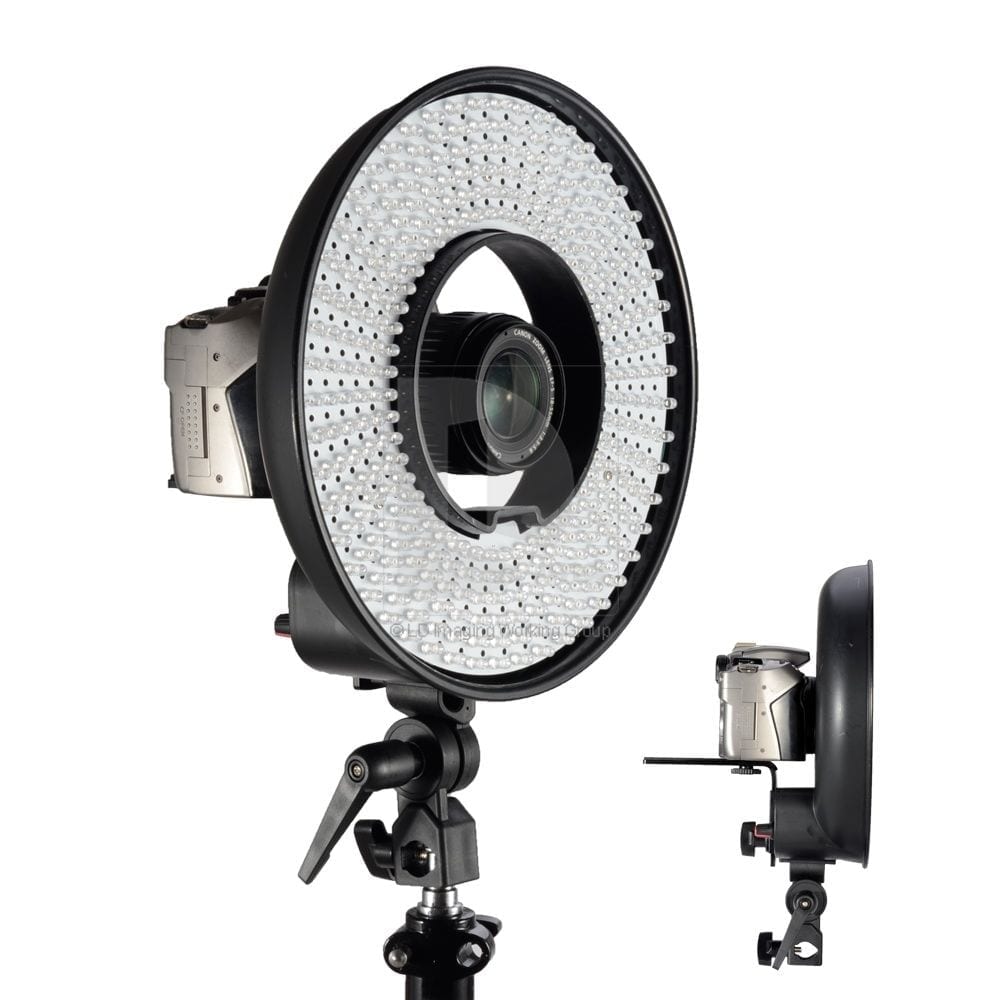
There are several types of lamps out there.
Mention: Though in the past fuel lamps were used as well, like those based on candles, oil, kerosene etc., nowadays they are obsolete, so we won’t discuss them.
The most popular types of lamps used for lighting nowadays fall into the following main categories:
– incandescent,
– fluorescent,
– gas-discharge
– and LED.
1. Incandescent lamps can be either plain incandescent or halogen incandescent. Halogen lamps are based on heating a material until it emits visible light (like old-style house-hold light bulbs that shone light as their filament got heated by the wire passing through it).
2. Fluorescent lamps work on the chemical interaction between the low pressure mercury vapour that exists in such lamps and the phosphorus coating on the inside of the tube. When electricity passes through the mercury it makes the phosphorus glow.
Mention: Variations of lamps based on this lighting method are Compact Fluorescent Lamps (CFL), induction lamps, and black-lights.
3. Gas-discharge lamps work similar to the fluorescent ones (electrical current passes through a gas), but use ionized noble gases to produce their light and the process is different.
Mention: HMI lamps (Hydrargyrum medium-arc iodide lamps) used in video and photography lighting are a subcategory of gas-discharge lamps. They are very powerful lamps with an average efficacy of 85-108 lumens per watt of electricity and also have a high CRI. However, during their lifetime, their temperature goes down by 0.5 to 1 °K per hour of use.
4. LEDs (or Light Emitting Diodes) work on electroluminescence, meaning that the material within them emits light as power passes through it. Though their CRI was initially too low to use in video work, recent advances have made them practical choices. However, they are still considered controversial and should be tested carefully before purchase.
Mention: A noteworthy type of gas-discharge lamp, aside from those mentioned above, is the plasma lamp, for which considerable progress has been made, despite initial problems that had made it impractical. Nowadays, high-efficiency plasma (HEP) lamps exist and perform well, though they are still quite expensive.
IMPORTANT! There are fixtures out there that allow selectable colour output. They have different types of lamps installed inside them (with different colour temperatures) and you can turn them on and off to achieve different configurations, as is the case with some fluorescent lamps or LEDs.
IMPORTANT! Apart from all of these things, when dealing with lighting and lighting equipment, you should keep in mind that there are many accessories that can make your life easier by giving you more control over the light. These include barndoors, booms, reflectors, umbrellas, flags, gobos, scrims, filters, gels, and, of course, stands.
Watts, Lumens & Foot-candles
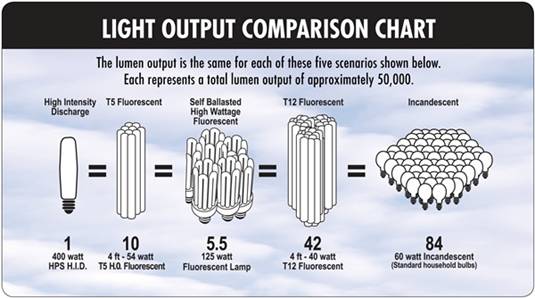
There is sometimes confusion, even in the case of some manufacturers, regarding the light emission level of a certain fixture when calculated in watts. Once technology evolved past incandescent light bulbs, the correspondence between the amount of light produced and wattage was lost.
Example: a 60 Watt incandescent light bulb (the old-fashioned kind) can produce about 800 lumens. The same amount of lumens will be produced by a Compact Fluorescent Lightbulb (CFL) at 13-15 Watts.
So, with the advance of technology, lumens and lumens/watt became the new norm to accurately express the amount of light a light source produces.
The science behind it is pretty extensive, but, in short, lumens have to do with radiance (which is the total amount of light emitted at the source). Meanwhile, lumens/watt express how many lumens are emitted per watt by the source.
Illuminance is another concept which consists of the level (intensity) at which something is illuminated at a distance from the source and is measured in Lux (1 Lux = 1 lumen per square meter). Add to this the fact that in the US light source output is measured in foot-candles and things get even more complicated.
Still, keep these concepts in mind and, using conversion tables if necessary, output in lumens will be more straightforward and useful to you than Watts.
IMPORTANT! A rule of thumb was devised and offered (see 7:26 in the video) to help in getting a general idea of how many lumens are necessary in a session, depending on distance and some camera settings.
So, as a general formula: with ISO 100, 180 degrees shutter, 24fps, T2.8, you should need 100 foot candles or 1076.39104167Lux.
TO ACTION!
To apply all the knowledge about video production lighting discussed so far in an actual video session, do the following:
A. Identify if there’s any natural light in the room.
A1. If yes, determine where the natural light is coming from (how many entry points there are, like windows etc.).
A2. Determine the Colour Temperature that the natural light has as best you can using charts and comparisons with various colour temperatures of daylight (write down your approximation).
B. Identify if there are other light sources in the room that do not belong to you and/or you cannot control (turn off, remove, change colour etc.).
B1. If yes, determine the Colour Temperature (or Correlated Colour Temperature) of these light sources as best you can (write down your approximation).
1. Based on calculations of Colour Temperature of the light that is present at the location, decide what type of lights from your kit you should use to match its Colour Temperature. If no light source is present at the location, use whatever lights you feel suit the subject of your session.
1.1. If you don’t have the required lights or there is already an environment with mixed types of lights re-orient your thinking and your shoot based on a mix-light environment.
2. Place the key-light (taking into account Illuminance requirements).
A3 If daylight is present, try and use it as a key-light if possible.
B3 If daylight isn’t present or you can’t use it as a key-light, but can use another light source already present on location and that you cannot remove as a key -light, do so.
3. Place the fill-light (taking into account Illuminance requirements).
A4 If you couldn’t use daylight as key-light, but it is present, try using it as a fill-light.
B4 If daylight isn’t present or you can’t use it as a fill-light either, but can use another light source already present on location and that you cannot remove as a fill-light, do so.
4. Place the back light (taking into account Illuminance requirements).
A5 Similar to above.
B5 Similar to above.
5. [OPTIONAL] Place the background light (taking into account Illuminance requirements).
A6. Similar to above.
A7. Similar to above.
6. Consider if other modifiers like gels, filters etc. are needed. If yes, apply them.
7. White Balance the scene either with a neutral reference from the scene, or with pre-made props.
8. Apply all your other video-related skills and shoot your soon-to-be masterpiece!
I hope this article has inspired you to experiment with your video production lighting. It’s time to get out there, grab a few lights and get to work!
If you have any comments, let us hear your thoughts in the comment section below. We’d also really appreciate it if you shared this article with your friends and colleagues. You can do that using the share buttons just below this post. Thanks for reading!
Matt Crawford
Related posts
5 Comments
Leave a Reply Cancel reply
This site uses Akismet to reduce spam. Learn how your comment data is processed.


Really cool information. Def needed that breakdown of the different lighting techniques, especially for interviews.
No worries, Matt. Glad to have you as a reader!
Great article! Really informative. Love the detailed breakdown and how you leave no stone unturned.
Excellent stuff!! Great explanation of some pretty tricky concepts. I’ll certainly be referencing this when i come to light my projects.
[…] Photo source: https://filmlifestyle.com/video-production-lighting/ […]